Getting engagement on your company’s (or clients’) Facebook posts is usually a good thing. That’s especially true when your Page receives positive comments or insightful customer questions.
But negative or spammy comments are another story. Your gut reaction may be to delete or even respond to these comments. Yet in many cases, hiding the comment is your best bet.
Before you begin dealing with negative engagement, it’s important to know how the process affects your Facebook Page, the commenter, and any other Page visitors.
Find out what happens when you hide a comment on Facebook and learn why taking this step can be a smart choice for your Page and your team.
What Happens When You Hide a Comment on Facebook?
Hiding a comment on Facebook provides immediate results. The comment disappears from public view right away so a typical user can’t read or reply to it.
But that doesn’t mean the comment is completely gone. It still remains visible to the original poster and all their friends. Because they can still view it, they won’t know that you hid their comment.
The comment also remains visible to your team even after you hide it. You can find all hidden comments in your Agorapulse social inbox. To view them, click on the All tab and filter by hidden comments.
Why Should You Hide a Facebook Comment?
Hiding Facebook comments is a good choice for social media managers in many frustrating situations.
You may want to hide comments on Facebook if:
The engagement doesn’t warrant a thoughtful response
Maybe the commenter is a troll, or perhaps it’s obvious that their negativity doesn’t have anything to do with your Page. Perhaps the comment is outright spam. You can simply hide it rather than trying to come up with a reply or letting others add to the thread.
Hiding a comment lets you check it off your to-do list. You don’t have to spend any additional time trying to think of something to say, and you prevent others from continuing the conversation.
You want to deescalate a heated situation
Maybe a nasty comment thread has taken root on your Page, or perhaps a Facebook user won’t stop engaging with your content. Either way, the last thing you want to do in this kind of situation is inadvertently anger a Facebook user further.
If you delete a user’s comment from your Page, your action will be obvious immediately. The original poster won’t be able to find their comment on your Page, which could lead to more negative comments or even a bad review.
In contrast, hiding a comment removes it from public view—but not from the original poster’s sight. They’ll still be able to see the comment, and they won’t be able to tell that you’ve hidden it. Ideally, the situation will reach a natural conclusion.
You want to keep a record of the comment
If you’re concerned about a user becoming a nuisance or a comment leading to a bigger issue, you may find it useful to keep a digital trail. Deleting engagement makes that tricky because it removes the content permanently from Facebook.
Instead, hiding problematic engagement removes it from view without deleting it completely. Essentially, you get the best of both worlds.
When you want to remove content from view, consider hiding a Facebook post if the following are true:
For Agorapulse users, hiding a Facebook comment is incredibly easy. Here’s how to do it:
1. Open your social inbox
Start by opening your social inbox in Agorapulse and selecting your Facebook Page. Locate the comment you want to moderate and click to open the item.
2. Hide the comment
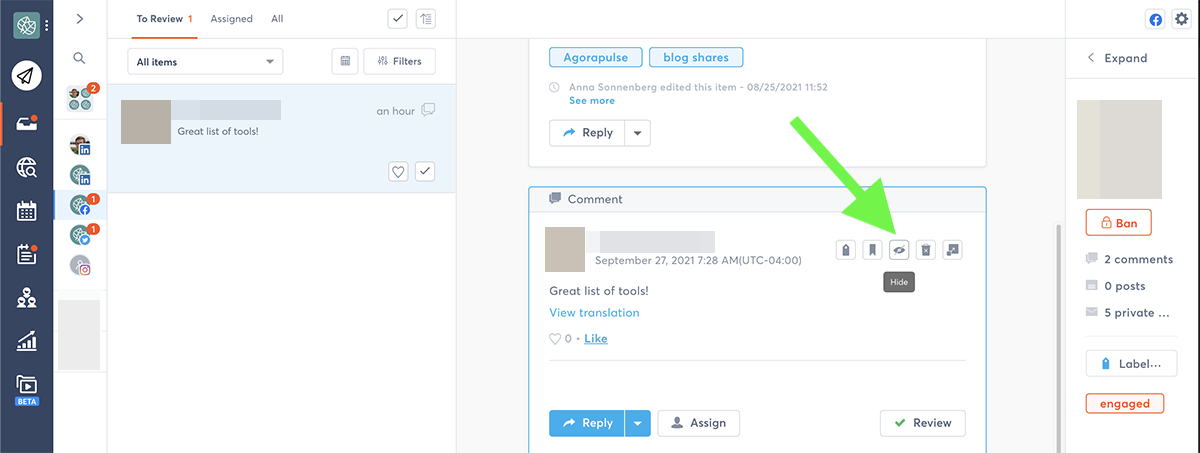
Click the eye icon to hide the comment. Just like that, it’s gone from public view. No one aside from your team and the original poster will be able to view it.
How to Unhide a Facebook Comment
Oops. Did you accidentally hide a Facebook comment, or did you change your mind? Do you want to make a hidden comment publicly visible again?
You can easily find and retrieve hidden comments in Agorapulse.
Click on the All tab in your social inbox. Then filter hidden items. All hidden items have a crosshatch pattern and a red Hidden by … note to make it clear that they’re not visible.
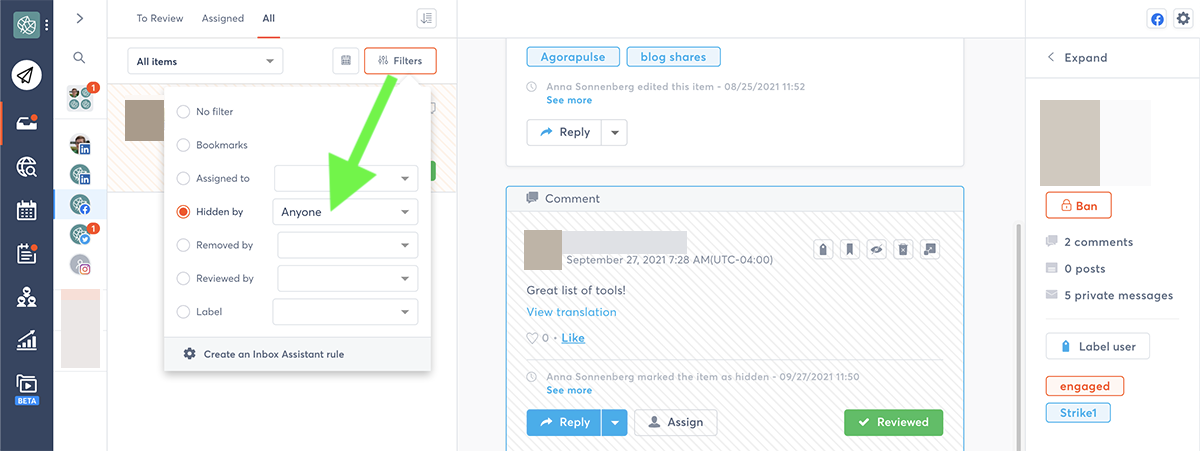
To unhide a comment, click on the eye icon again. The comment and any replies will immediately become visible to everyone who visits your Page or sees your content in their feed.
What to Do Before Hiding a Facebook Comment
Hiding negative comments is an efficient way to remove them from your Page without creating additional conversation. But before you shield them from view, you may find it helpful to take these steps.
Private message the user
Moderating Facebook engagement can be tricky, especially if the negative engagement is related to a sensitive topic. If you’d prefer to acknowledge the comment privately before removing it from view, send a message to the user before hiding it.
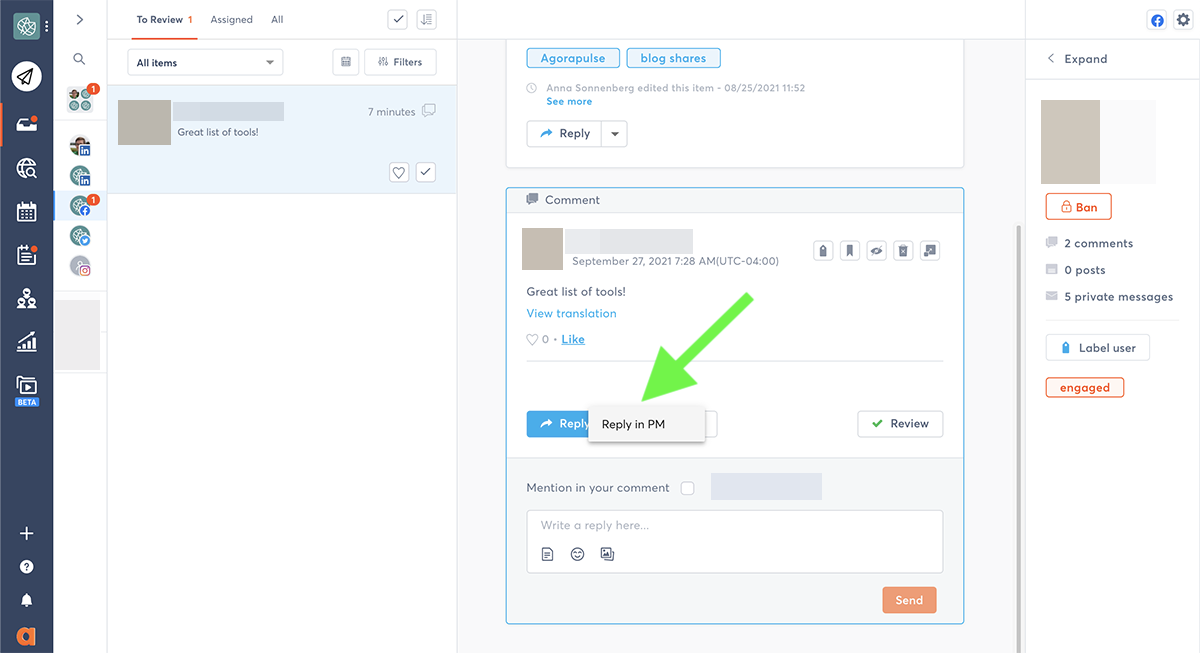
Find the comment in your social inbox and click the blue arrow. Select Reply in PM to contact the user privately. Then you can proceed to delete the public comment.
Tag the comment
Spending a ton of energy on negative Facebook comments isn’t a great idea for anyone. But keeping track of Facebook interactions can be helpful for your team.
When you track the type of feedback you receive, it’s easier to identify patterns.
For instance, you may find that a certain type of post generates a lot of negative comments. In response, your team might brainstorm new ways to speak about challenging topics or simply prepare to deal with negative feedback.
To tag a comment, click on the label icon. Then select the label you want to apply or type a new one.
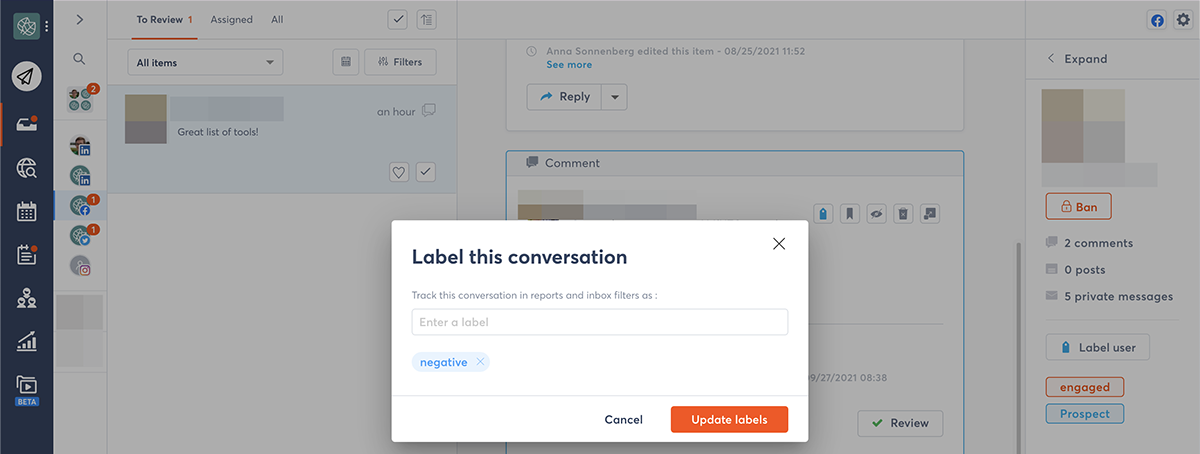
Afterward, you can filter your inbox by label to take a closer look at negative or spam engagement. You can also use your Facebook report to track inbox label distribution.
Bookmark the comment
Do you want to keep track of certain Facebook comments? You can bookmark any comment in your social inbox so you can find it again easily.
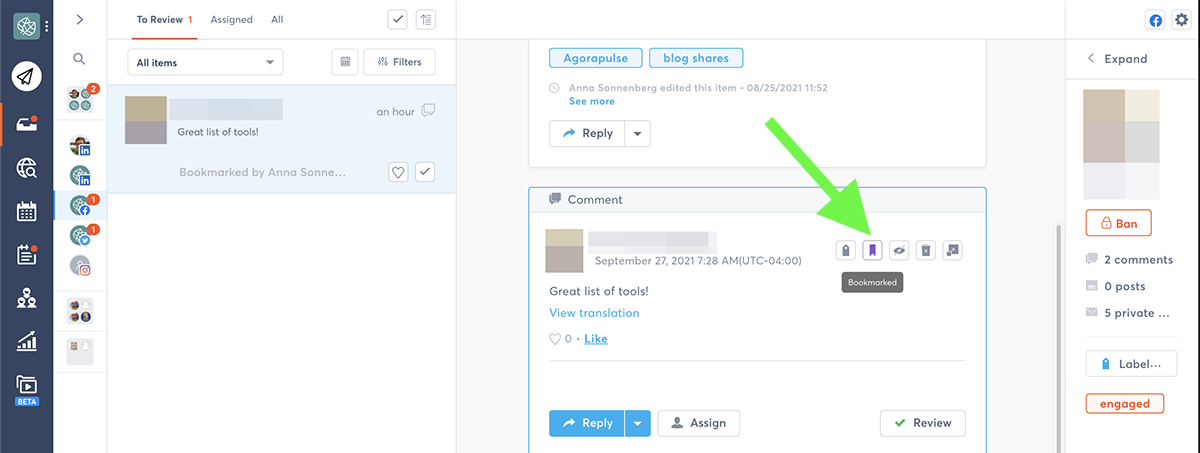
Open the comment in question and click the bookmark icon. Then use the social inbox filter to find bookmarked comments if you want to review them again in the future.
View the comment on Facebook
Most negative comments don’t require much thought or deliberation. Rather than giving the original poster the benefit of the doubt, you can simply hide the comment and get on with your to-do list.
But some negative engagement requires a little context. If you’re unsure what prompted the comment or if you want to see whether it’s part of a more complex thread, you can view the entire exchange on Facebook.
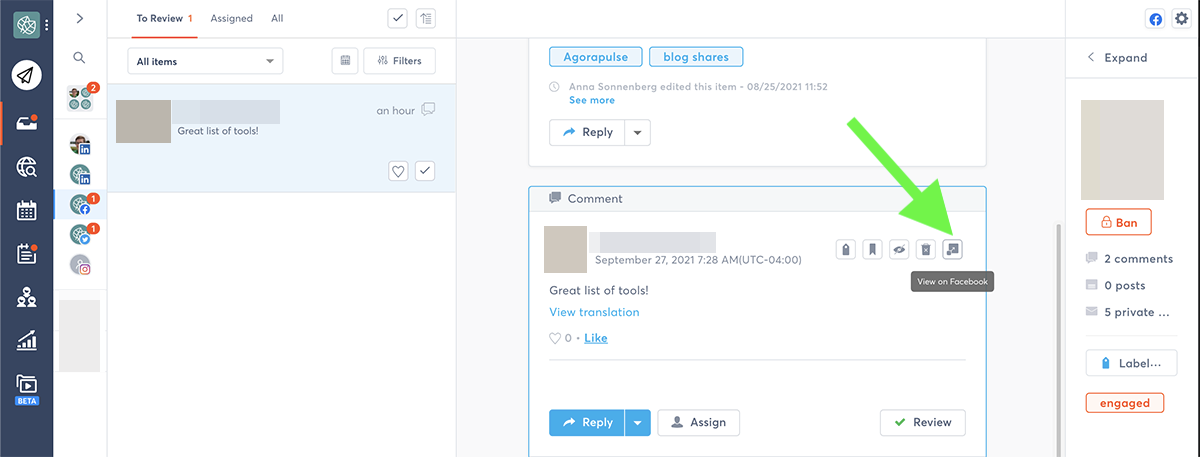
Click the View on Facebook button to open the post directly in Facebook. From there, you can read through all the comments and reply as your Page. You can also delete, hide, or report comments from Facebook Business Manager.
Assign the comment for review
In many cases, there’s no question that a comment is inappropriate for your Facebook Page. When that happens, you can hide it immediately without further deliberation.
But in some cases, a comment may be a borderline situation. You might not be able to decide whether to respond to it or hide it.
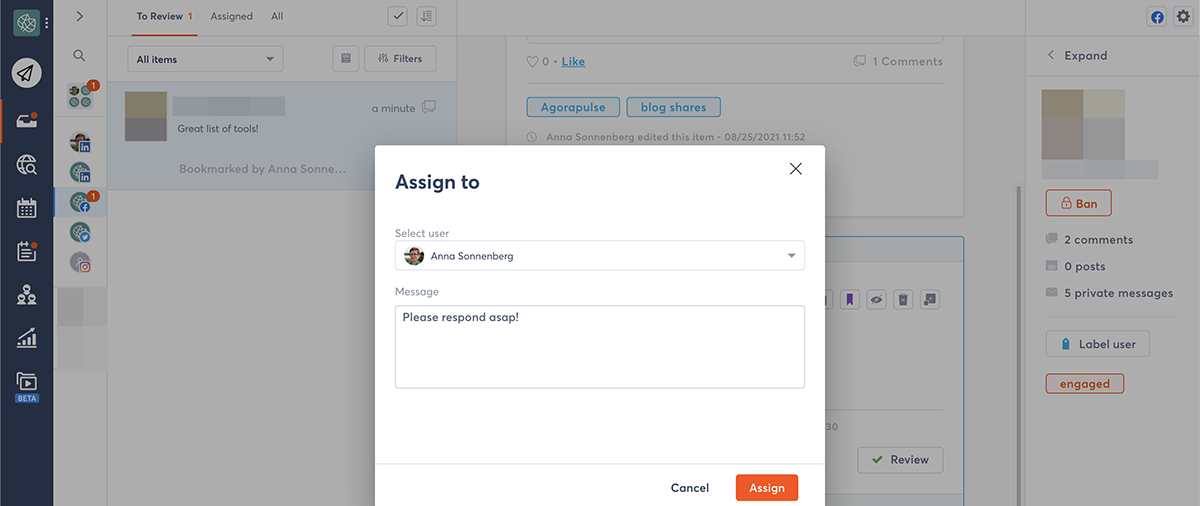
Rather than removing the comment from view, you can assign it to a colleague for review. Click the Assign button and choose the person to review it. Then type a brief message and click Assign. The comment will remain visible until you take further action.
Label the user
If your Page repeatedly receives negative engagement, your team may find it helpful to track the posters. After a poster leaves a certain number of harmful or spammy comments, you might decide to ban them from your Page.
To keep track of these posters, expand the panel on the right side of your social inbox. Then click the Label user button to apply an existing label or create a new one.
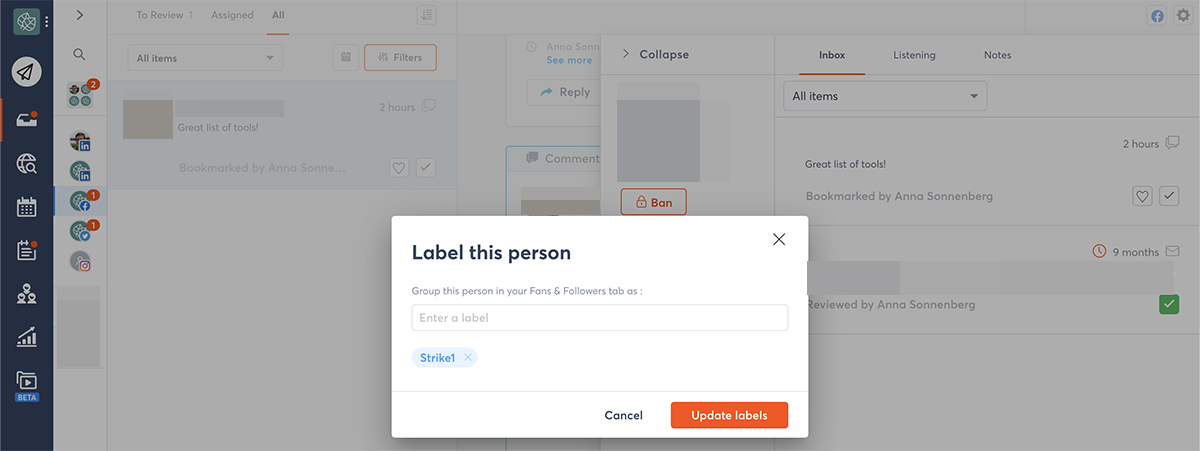
You can also review the user’s entire engagement history with your Page. Scroll through the inbox tab or sort by engagement type to see the comments, messages, or posts they’ve left on your Page.
Keep internal notes
Agorapulse’s social inbox makes it easy to keep your team in the loop. Click on the notes tab to read your team’s past interactions with the user.

Click the Add a note link to leave your own commentary. You can keep track of the context of the situation, the action you took, or anything else your team would find helpful.
What to Do Instead of Hiding a Facebook Comment
If your Facebook Page occasionally receives negative engagement, hiding comments can be an effective way to handle the situation. But what if your Page regularly gets negative engagement—or if a few select users become repeat offenders? Agorapulse can help you manage these outcomes too.
Set up an automated rule
If your Page’s negative or spammy comments tend to follow a similar formula, you can opt out of dealing with them manually. Instead, you can use Agorapulse’s Inbox Assistant to moderate engagement automatically.
Click Create an Inbox Assistant rule or open this panel directly from your social profile settings. Then create a rule to manage negative engagement automatically.
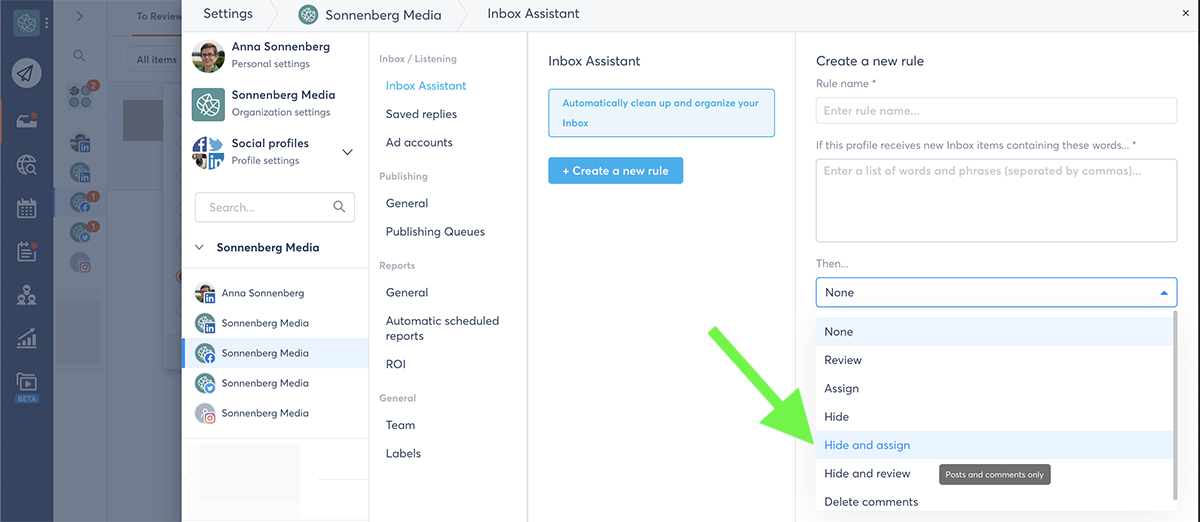
Type the words that typically appear in the comments you want to moderate. Then select an action to take. You can select Hide and review if you don’t want them to appear as new items in your social inbox.
Alternatively, you can select Hide if you want to remove them from view but continue to receive them in your inbox. You can also select Hide and assign if you want to remove them from view yet also ensure a certain team member sees them.
You can also automate Agorapulse’s bookmark and label functions from this panel. That way you can continue to keep track of negative engagement without having to bookmark or tag them manually.
Delete the comment
Hiding bad Facebook comments removes them from public view and prevents other users from interacting with them. In many cases, that’s all you need to do to moderate negative engagement and deescalate the situation.
But if your Page receives a particularly egregious comment or obvious spam, you can take more assertive steps to address the situation. To delete a comment click the trash can icon in your social inbox. When you delete a comment, no one—including the original poster—will be able to see it.
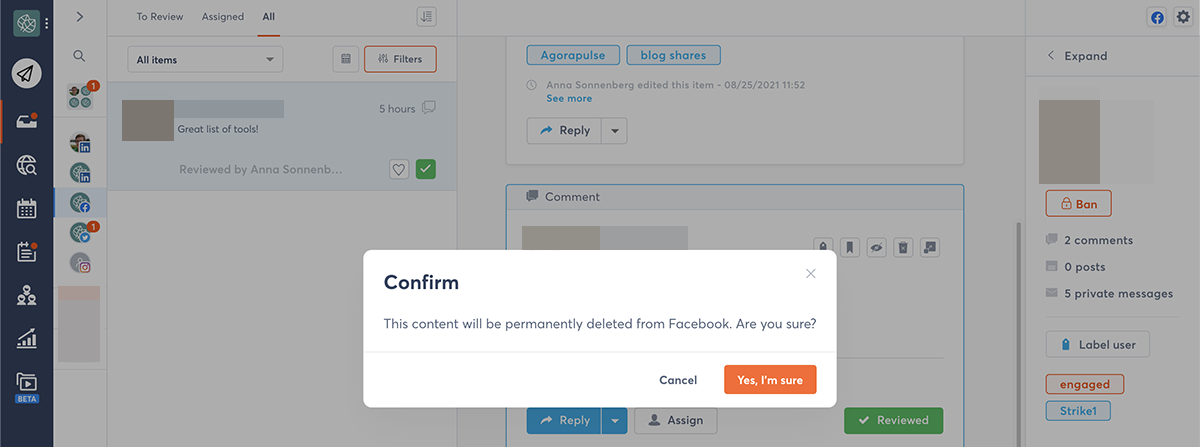
With Agorapulse, you can create automated rules to delete spammy or hostile comments. Follow the steps outlined above to set up an Inbox Assistant rule so you can moderate this type of engagement manually.
Report the comment
Automating spammy and negative comments from Agorapulse’s Inbox Assistant can save your team a lot of time and hassle. But it’s important to remember that these steps may not reduce the volume of negative engagement your Page receives.
In other words, your Page may continue to receive spam and harmful comments. You just won’t have to moderate them manually.
Fortunately, you can take additional steps to reduce negative engagement. First, click to view a spammy comment on Facebook. Then click the three dots to the right of the comment and select Give feedback or report this comment.

Choose your reason for flagging the comment, from harassment or hate speech to false information or spam. Then proceed to report the comment.
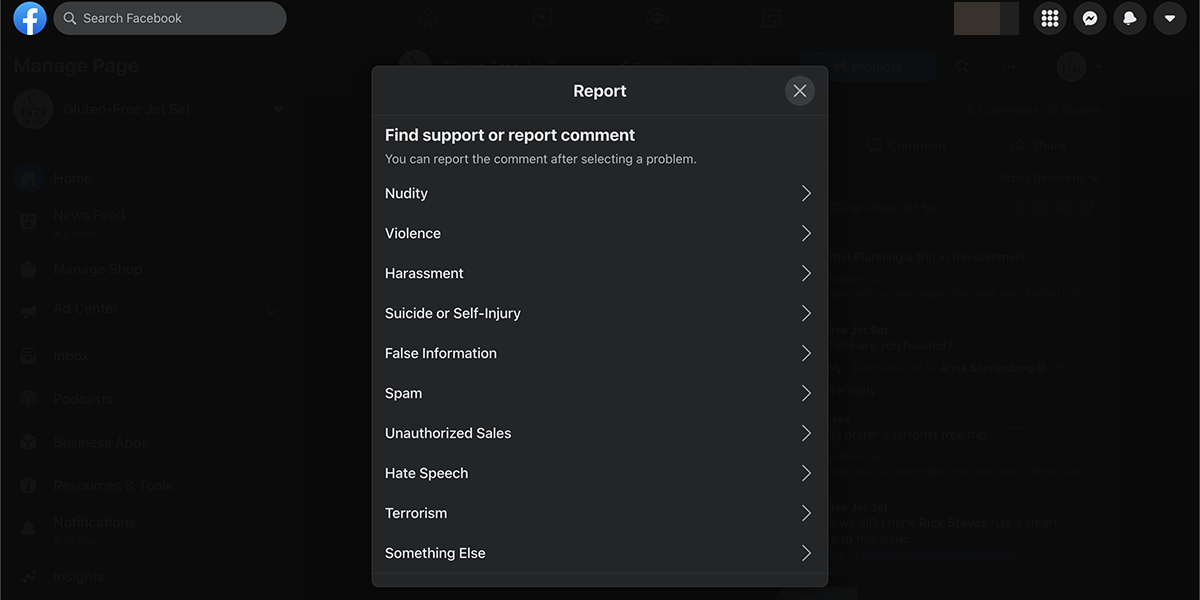
After reviewing reports, Facebook removes comments that go against Community Standards. Facebook doesn’t reveal who reported the comment, so you don’t have to worry about confidentiality.
Restrict who can comment
Facebook Pages allow public comments by default. That means anyone can engage with your Page. In most cases, that’s a good thing. After all, most brands, organizations, and public figures want more engagement from fans and followers.
But more engagement isn’t always a good thing. If your Page receives a lot of spammy or negative engagement, you may want better control over who can comment on your posts.
You can set rules for engagement on any Page post. Click the three dots in the upper right corner of any Page post. Then select Who can comment on your post?
If you don’t want to allow public comments, select Pages you follow or Profiles and Pages you mention instead. When you create posts for your Page, keep these options in mind and take care to tag any Pages or profiles you want to join the conversation.
Note that taking this course of action may seriously restrict the engagement your Page receives. It’s best for when you want to set up a guided conversation around a topic. But it isn’t a smart solution for long-term moderation.
Ban the user
If certain users repeatedly leave negative engagement on your Page, you don’t have to allow them to continue to follow. Instead, you can ban repeat offenders from viewing or commenting on your Page’s content.
Agorapulse gives you two ways to ban a user from accessing your Page:
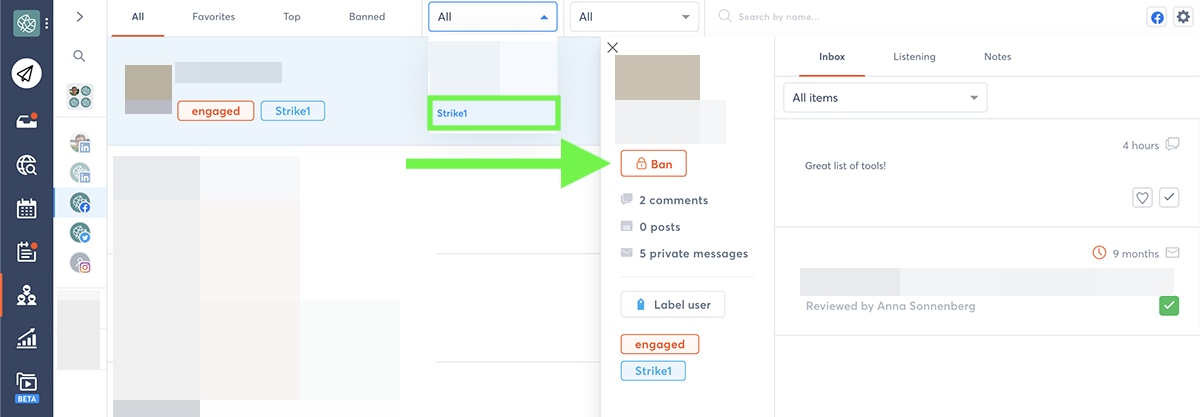
From the social inbox: Open any comment or private message and click the orange Ban link in the upper right. The user won’t be able to engage with your Page again.
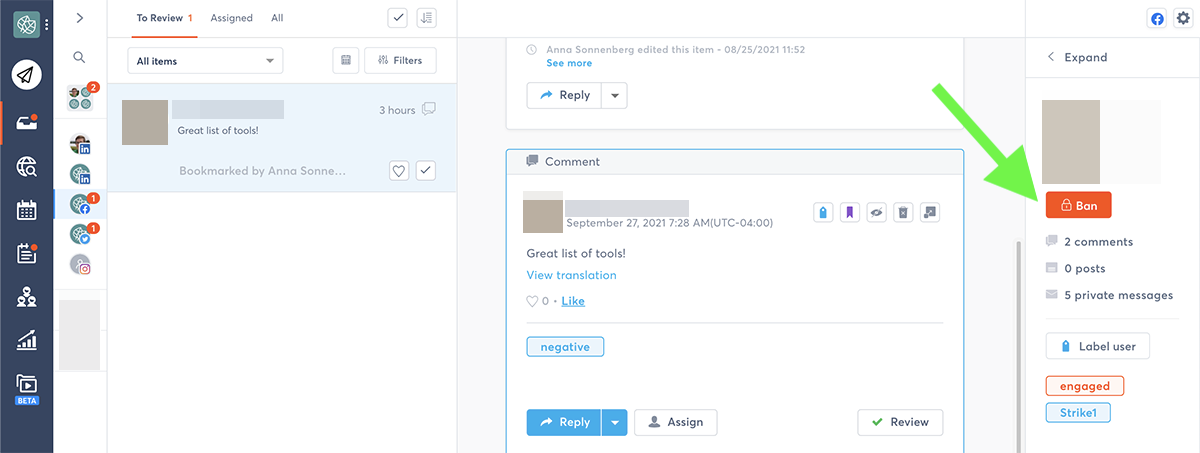
From the Fans & Followers tab: Search for users you’ve labeled as problematic in the past or use the search function to find specific users or comments. Select any user and click the Ban button to prevent them from accessing or interacting with your Page again.
What Happens When You Hide a Comment From Your Personal Facebook Profile?
Now you know what happens when you hide a comment on Facebook from the perspective of the social media manager and the original poster. But what if you want to hide a spammy or offensive Facebook comment on another Page or even on your own content?
You can easily hide comments via your personal Facebook profile. Log in to Facebook and find the comment you want to hide. Click the three dots to the right of the comment. Then select Hide comment to remove it from your own view. Everyone else will still be able to see it, but you’ll no longer have to think about it.
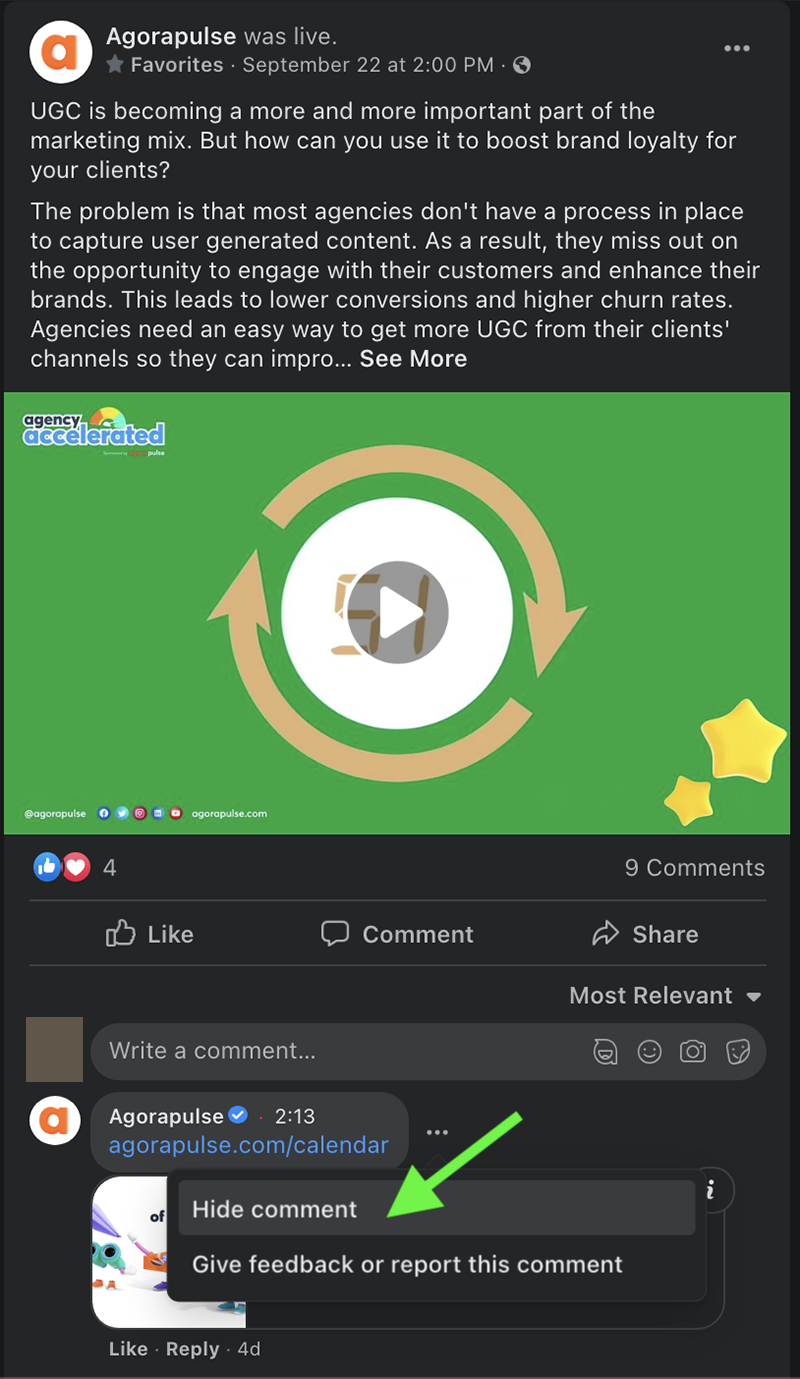
If the comment goes against Facebook’s Community Standards, you can report the comment instead. Your report is anonymous so you don’t have to worry about the original poster learning your identity.
Why Should You Hide a Facebook Post?
As a Facebook user, you have tons of control over the updates you share with your friends and followers. You can easily set privacy levels for your personal page, and you can make some or all of your content visible to friends, friends of friends, or the general public.
But what should you do if you want to clear certain content from your personal timeline?
You may not want to hurry to delete the post from Facebook but choose instead to hide the content.
When you want to remove content from view, consider hiding a Facebook post if the following are true:
It’s linked to other types of Facebook content
You can’t always delete Facebook content without causing related issues. For example, if you delete your profile or cover image from your timeline, the image disappears from your profile completely. That means you can no longer use it as your profile picture or cover image.
Likewise, if you delete a life event from your timeline, such as a new job or a relationship milestone, it disappears altogether.
Hiding this kind of content lets you preserve it without highlighting it on your timeline.
You didn’t post the content in the first place
If someone else shared content on your timeline or tagged you in a post, you don’t have the option to delete it. Instead, hiding the post is the only opportunity you have to remove it from your timeline.
The post is outdated or embarrassing
Not every Facebook post ages well. Some might become obsolete, especially if they feature a friend you’re no longer close with or a viewpoint you’ve outgrown. Other posts might become awkward, such as photos from an ex-relationship or from an event where you didn’t look your best.
Hiding those posts lets you tuck them away, so they’re much harder to find.
You want to curate your timeline
Maybe some of the posts on your personal page aren’t exactly incriminating, but they definitely don’t show you in your best light. If you tend to friend a lot of professional colleagues or if you want to create a more tailored image, you might not want to give these posts a prominent spot on your timeline.
If you hide them, you can keep the memories while putting your best foot forward.
How to Manage Multiple Facebook Pages Without Going Nuts
How to Hide a Facebook Post With Any Device
Whether you’re using Facebook on a desktop, on a laptop, or on the mobile app, you can hide a post with just a few clicks or taps.
Here’s how.
1. Navigate to your personal Facebook page
First, open Facebook. If you’re using a laptop or desktop, navigate to Facebook.com in your preferred browser. If you’re using a mobile device, open the Facebook app. Then log in to your account by entering your password and your email or phone number.
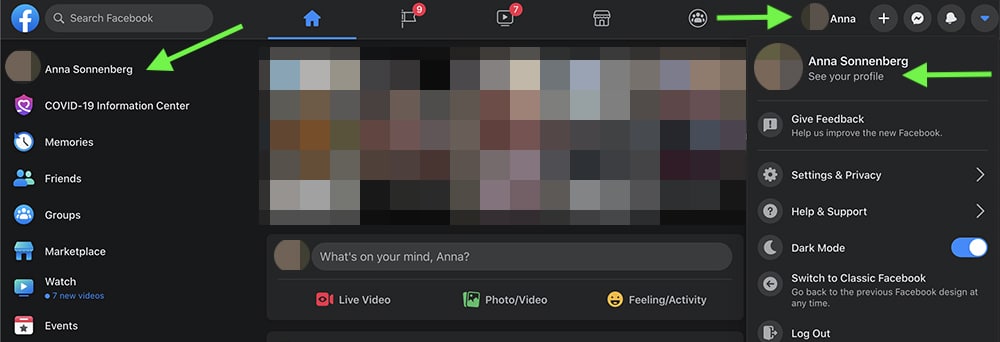
Next, open your personal page by clicking on your profile picture. In a desktop or laptop browser, you’ll find your profile picture in the upper left corner of the page, near the middle of the blue menu bar, and at the top of the main dropdown menu.
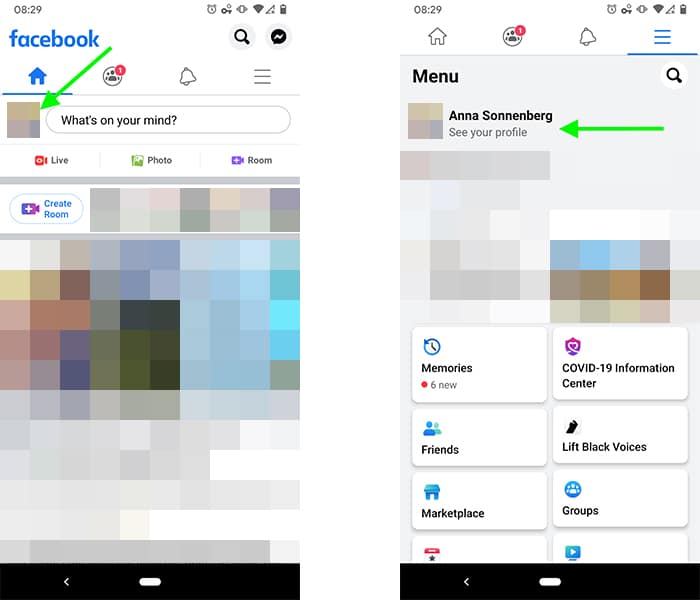
On the mobile app, you’ll find your profile picture in the upper left corner of the app or at the top of the main menu.
2. Hide the Facebook post of your choice
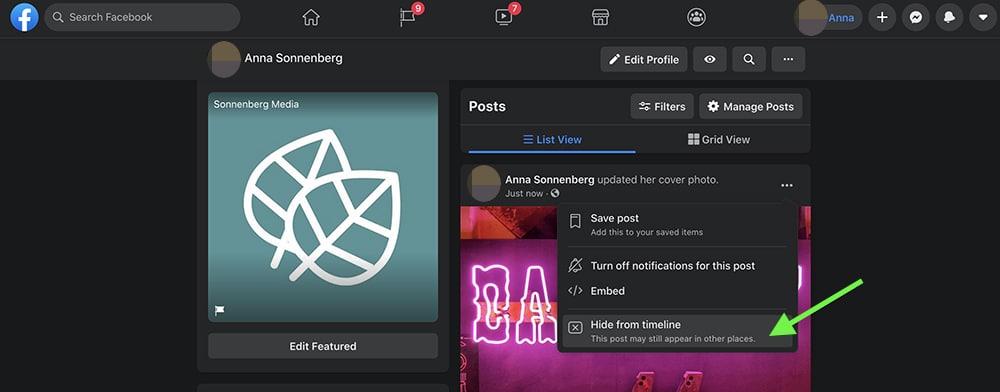
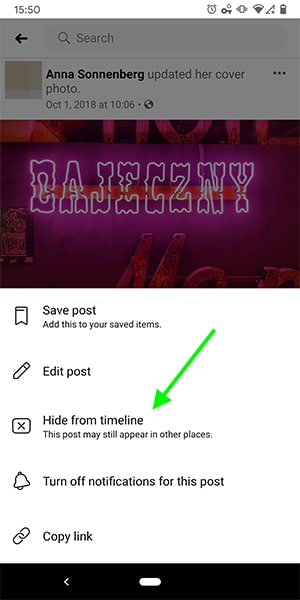
Once you’ve opened your page, scroll through your personal timeline until you find a post that you want to hide. Click or tap the three dots in the upper right corner of the post.
Skim past the editing options, and select Hide From Timeline. In a desktop or laptop browser, you’ll find this option near the end of the menu.
In the mobile app, you’ll find it in the middle of the menu.
3. Confirm your actions
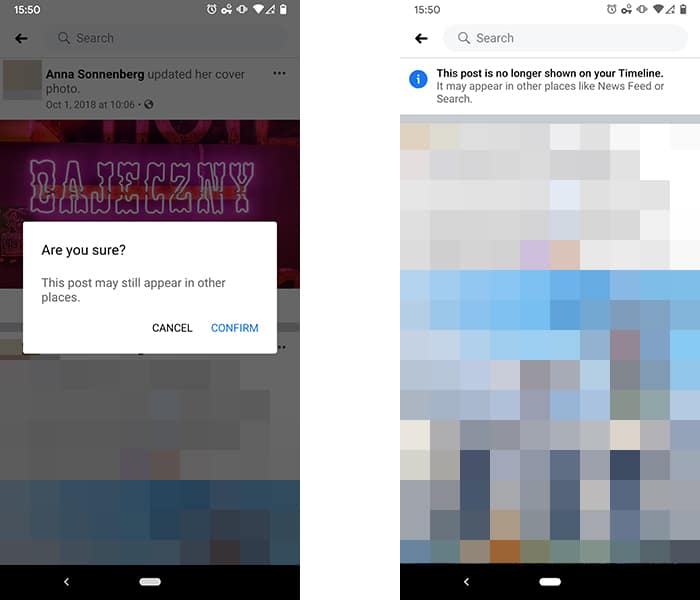
Depending on the Facebook version you’re using, you may receive a pop-up message saying, “Are you sure you want to hide this post from your timeline? It may still appear in other places on Facebook.”
If you’re sure, click or tap Hide. If you changed your mind or selected the wrong post, click or tap Cancel.

When you select Hide, you’ll see a message confirming, “This post is now hidden from your timeline.”
You won’t see the post on your timeline again. If you choose Cancel instead, the post remains unchanged.
What to Do After Hiding Your Facebook Post
Depending on your reason for hiding the post, you may need to take a few more steps to deal with the content. But since you’ve hidden the post, you need to find it again before you can take any other actions.
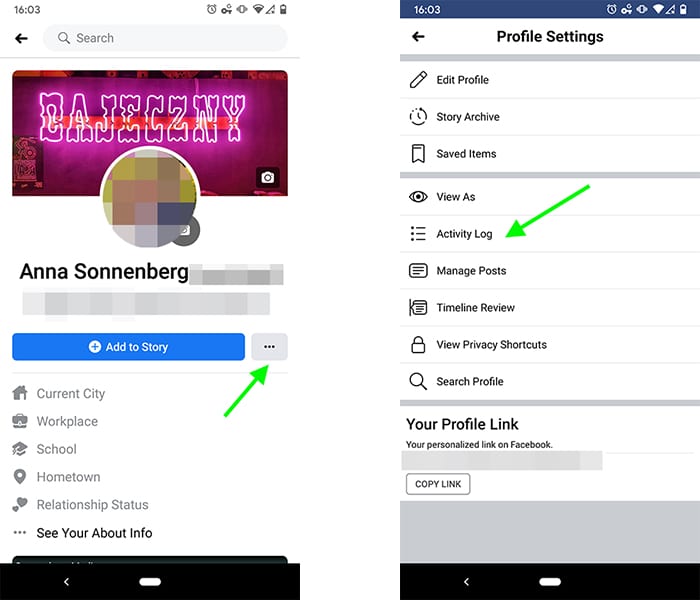
First, locate your Activity Log. If you’re using a desktop or laptop browser, it appears as in the main dropdown menu.

You can also find it by clicking the three dots near the upper right corner of your profile page.
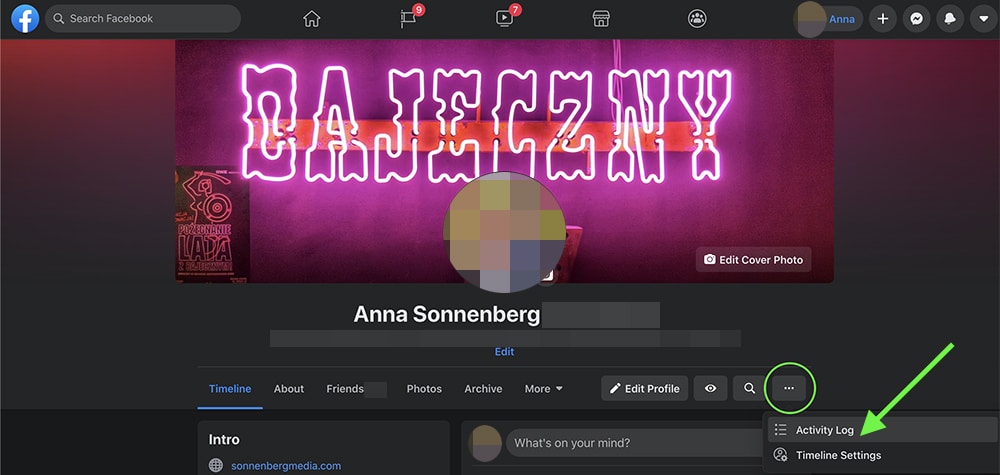
If you’re using a mobile device, tap the three dots under your name to access your Profile Settings.
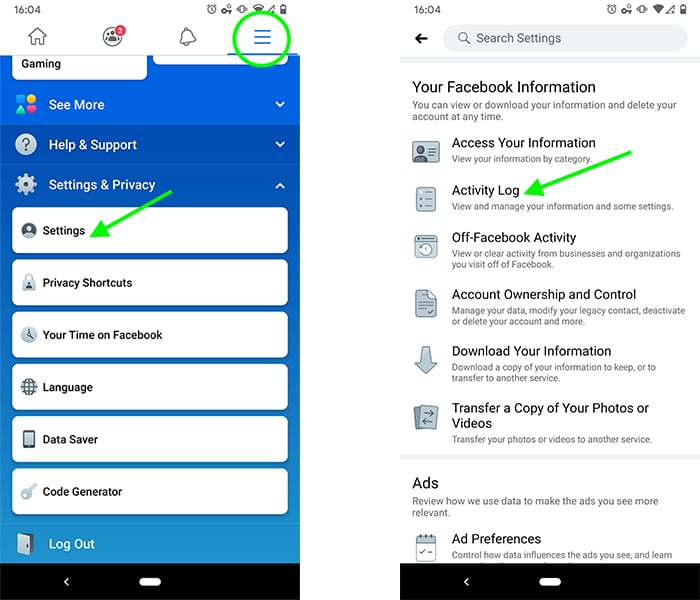
On mobile, you can also find your Activity Log in the main menu in the upper right corner of any Facebook page.
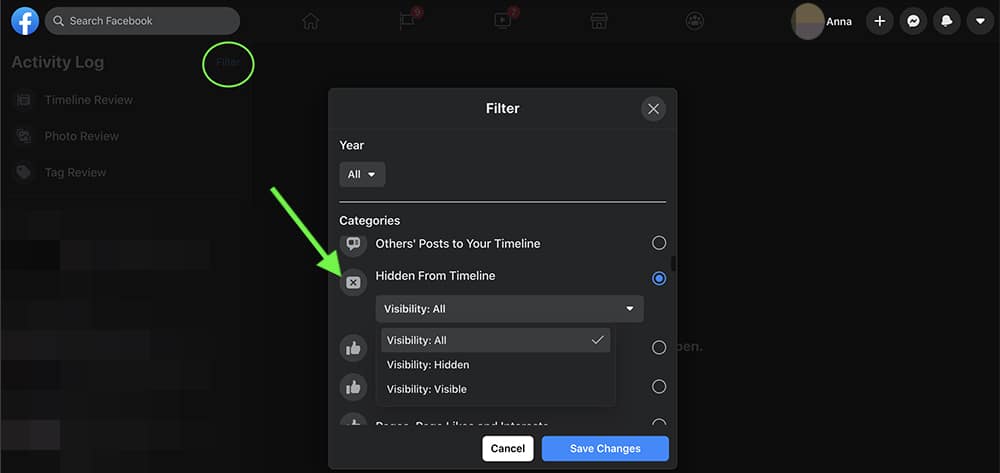
Next, find the hidden posts in your Activity Log. On a desktop or laptop, click the Filters button near the upper left corner. Then select Hidden From Timeline in the menu.
On a mobile device, select Filters and Categories. Tap Logged Actions and Other Activity, and select Hidden from Timeline.
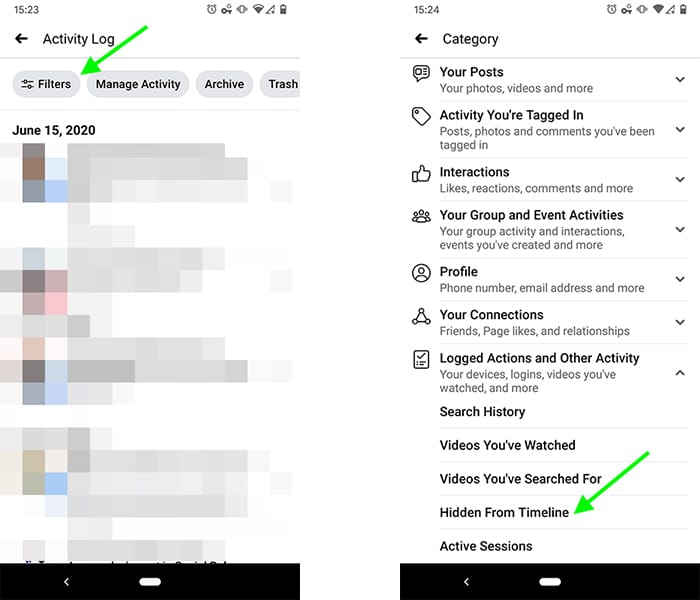
Next, scroll through your hidden content. Once you’ve found the hidden post in question, you can take one or more of the actions below.
Untag yourself or report a Facebook post
If another Facebook user tagged you in the post but you don’t want to be associated with the content, you can easily untag yourself. Click or tap the post’s dropdown menu, and select Remove Tag.
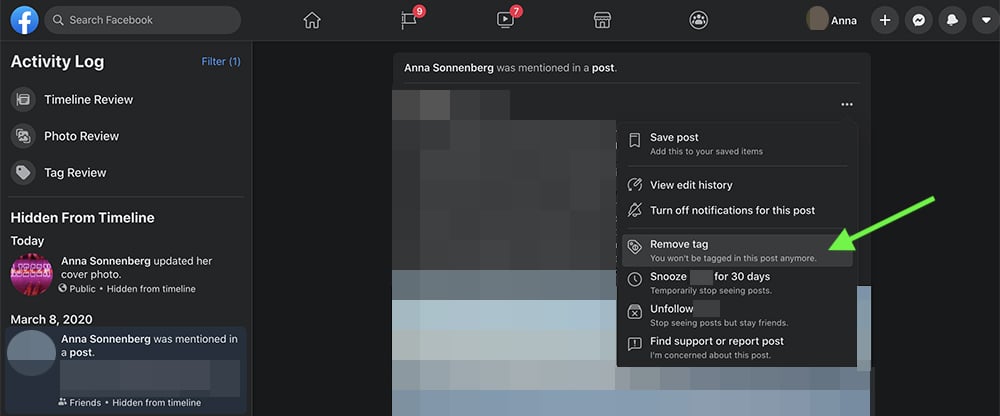
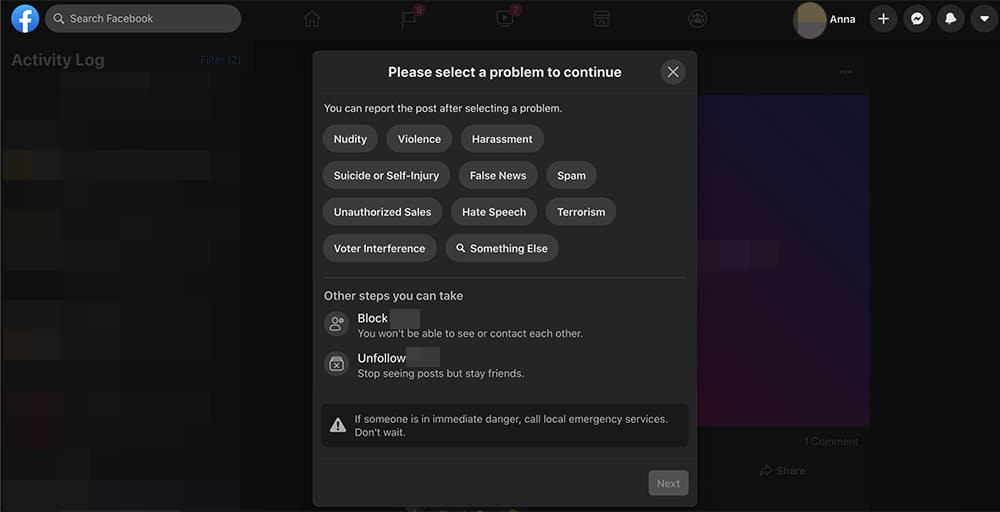
If the post is abusive or social media spam, you can also report it to Facebook. Select Find Support or Report Post to report Facebook content, and consider unfollowing or blocking the user, too. You won’t have to interact with the user again, and Facebook will remove the post on your behalf.
Unhide a Facebook post
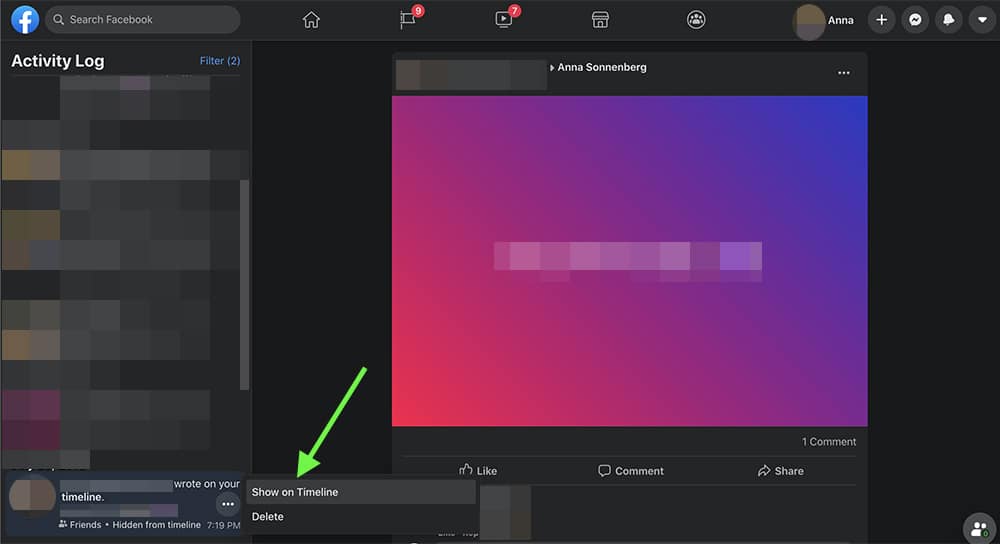
If you hid a post by accident or if you’re ready to put it back on your timeline, you can typically unhide it.
To unhide a Facebook post, click or tap the post’s dropdown menu, and select Show on Timeline. When you unhide posts, they reappear back on your timeline based on the date of the original post.
Delete a Facebook post
Just because you’ve hidden a Facebook post from your timeline doesn’t mean other people can’t see it in their personal newsfeeds. For example, if you hide a photo from your timeline, your friends can still comment on and react to the post if it appears in their newsfeeds.

Select Turn Off Notifications For This Post if you don’t want to know when friends or followers engage with the post. If you need a more permanent solution, you can always delete it completely. Tap or click on the post’s menu, and choose Delete to remove the content from Facebook.
In Conclusion
Sometimes deleting Facebook posts outright is the most effective way to remove content from the platform completely. But deleting content isn’t always possible, even if you’re a social media expert. Hide offending Facebook posts when you need a temporary solution or when you don’t control the content—and don’t hesitate to take additional action to protect yourself when necessary.
Get started on your Facebook marketing today by signing up for a free Agorapulse trial.
Read more: agorapulse.com


