[ad_1]
Lessons from an ex-McKinsey administration advisor

Have you ever struggled to get your slides to be “just right”?
While some others seem to make lovely slides with minimal hard work?
Really slides do justice to your message. They aid emphasize what’s important. But it can be this sort of a time drag. I utilised to commit hrs and hours just before I figured out which edits work and which edits don’t.
Increase yours today with these 8 style tweaks:
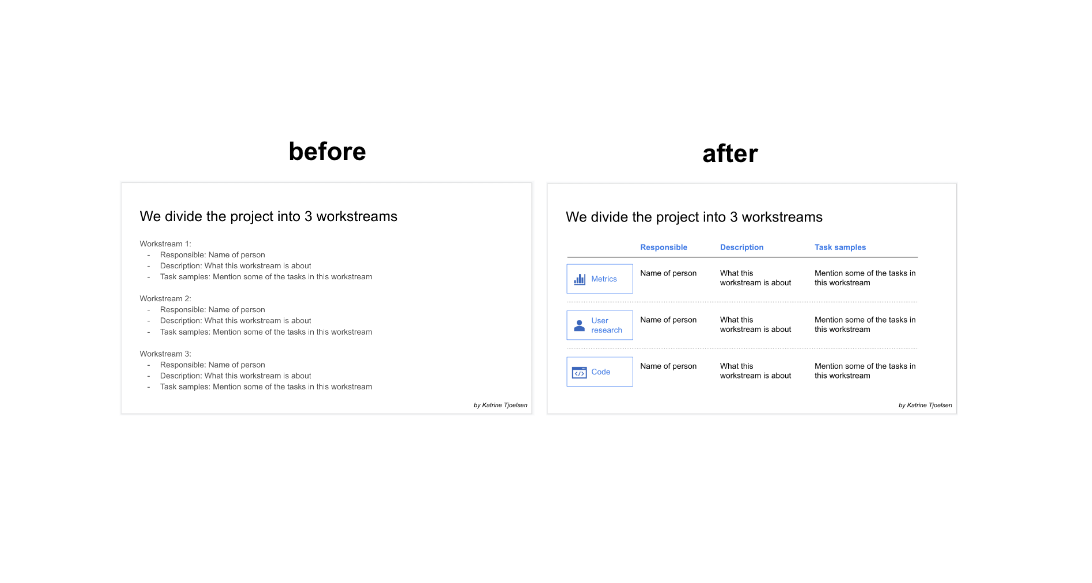
Ever developed slides that are dumps of text? Search for prospects to framework the details into a desk as a substitute

Like this:

When this initially iteration of our custom made table does not look gorgeous, we’ll now use our tweaks to enhance it.
And bold the column headers. Glimpse how considerably cleaner this appears to be?

Instead, try out eradicating the fill shade and providing the border a diverse coloration:

One more twist is to give the box a colour (with no border) and make the textual content white:

Different font dimensions can get messy, though they’re from time to time acceptable.
I desire to make all the textual content the exact size, and use color instead for emphasis:

As we’re doing the job, text bins inevitably finish up misaligned and unevenly spaced.
And it seems to be additional professional when it is sorted:

How to align in Google Slides
- Pick out all merchandise in a row, then click Organize → Align → Top rated.
- And choose all merchandise in a column, then click Prepare → Align → Left.
How to distribute things evenly vertically in Google Slides
- Find all objects in a row, then click Arrange → Team. Do this for every row.
- Then pick out all related rows and click Set up → Distribute → Vertically
This eliminates a distraction from the articles (the divider traces) and results in a distinction in between the divider lines and the header line.

A handful of, applicable, very well-put icons make the slide pop.

If you’re utilizing Microsoft PowerPoint, you can add icons in seconds by clicking Insert → Icons.
[ad_2]
Resource url


