[ad_1]
Customers often ask us: “How can I use GetResponse to promote my business?”
We’ll start by sharing other customers’ success stories for inspiration, and we’ve also decided to show you how our Marketing Team uses GetResponse to promote and educate about, well, GetResponse.
In this article, I’ll talk about how we run webinar marketing campaigns. And since we organize close to 40 webinars every year, with our top one so far attracting more than 4,000 registrants, there’s a lot to talk about.
Hopefully, by sharing the exact same process our team follows, this article will inspire you to look into all the ways webinars can help your business prosper. And who knows, maybe you’ll even use GetResponse for your own success story!?
Here’s how we run our webinar marketing campaigns in 8 steps:
- Planning the campaign
- Creating the webinar
- Preparing the registration page
- Sending the webinar invitation
- Creating the website popup
- Promoting the webinar via social media, partners, and paid ads
- Running the webinar
- Sending the follow-up
But first, let’s briefly explain what we mean by Dogfooding.
Dogfooding:
Dogfooding is the practice of using a company’s own products or services internally, either for testing purposes or as a way for employees to familiarize themselves with new features or products. The term “dogfooding” comes from the phrase “eat your own dog food,” which means to use what you produce.
Our Marketing Team uses its own marketing software, GetResponse, to develop marketing campaigns to better understand the features, capabilities, and see things from the perspective of our customers. It also gives us a sense of ownership and pride in the products we develop.
Step 1. Planning the campaign
Tools used: MS Word, MS Teams, Jira, Slack
Before diving into a webinar campaign, our team meets to discuss the details of the upcoming project.
Specifically, we try to find answers to the following questions:
- What’s the goal of this campaign?
- Who are we trying to reach?
- What will the webinar be about?
- When will we run it?
- Who’ll host and support the webinar?
- What marketing activities will we be able to do?
- How will we follow up after the webinar?
Example: The goal of your webinar could be to educate your current and prospective customers on a new tool. Or it could be to educate them about a new marketing topic and to promote your new ebook. In both cases, the goals can be measured using different metrics, like product adoption or demo requests vs. ebook downloads.
Going over these questions helps our team align and decide on the scope of activities that we want to pursue.
For example, when the webinar campaign needs to be launched within the next two weeks, we know that we won’t have enough time to prepare the assets – copy, banners, videos – for paid media campaigns (Facebook and Google ads) and will need to stick to owned media (website, emails, in-app communication).
Once we’ve agreed on the details, we create tasks for our team so they can all start working on their activities. This usually includes designing banners and writing copy for the webinar registration page, webinar invitation email, and popups.
Pro tip: Even though we’re a remote-first company and do multiple things asynchronously, we try to kick off projects like these during a live call. It helps us get everyone onboard and it makes the project more “real.” Everything that we agree on in this call is then summed up in a Slack channel and appropriate Jira epic.
Step 2. Creating the webinar
Tools used: GetResponse Webinars
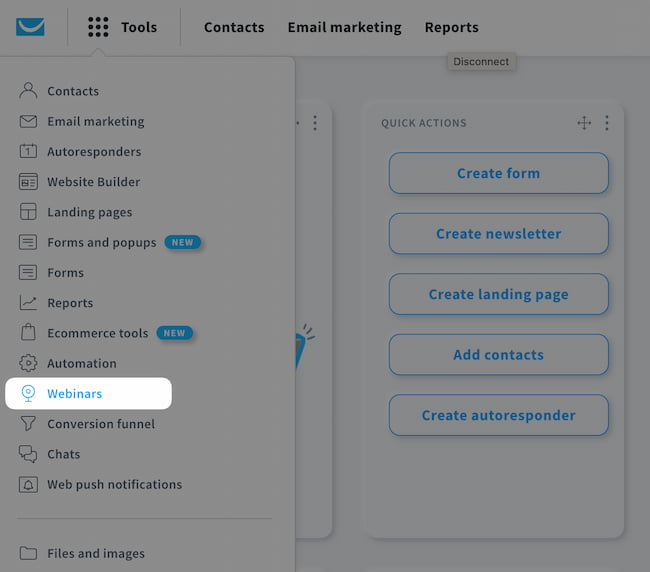
As soon as we’ve decided on the title and date for the webinar, we log in to our GetResponse account and head over to the webinars tool.
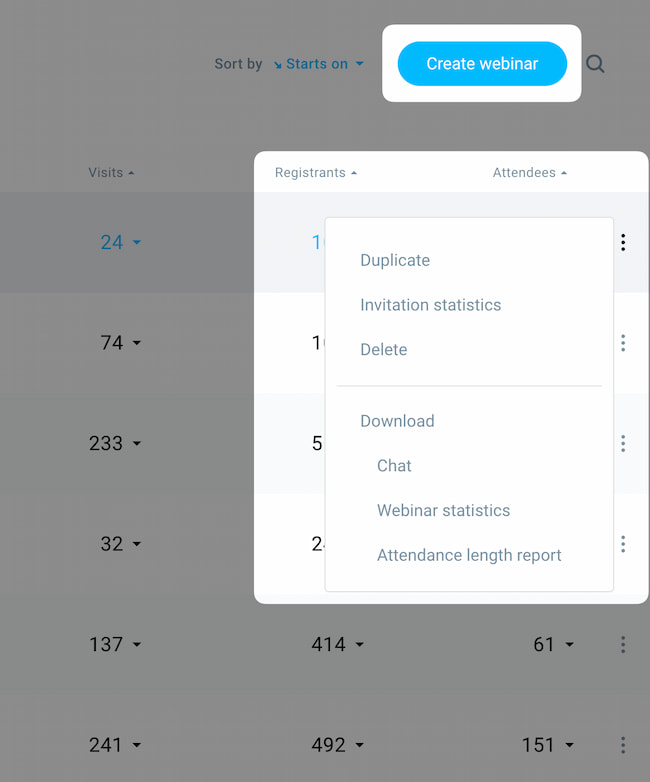
There, we either create a new webinar from scratch or duplicate one of our past webinars. The latter solution saves us a bit of time as it carries over most of the settings we’d otherwise have to fill in by hand.
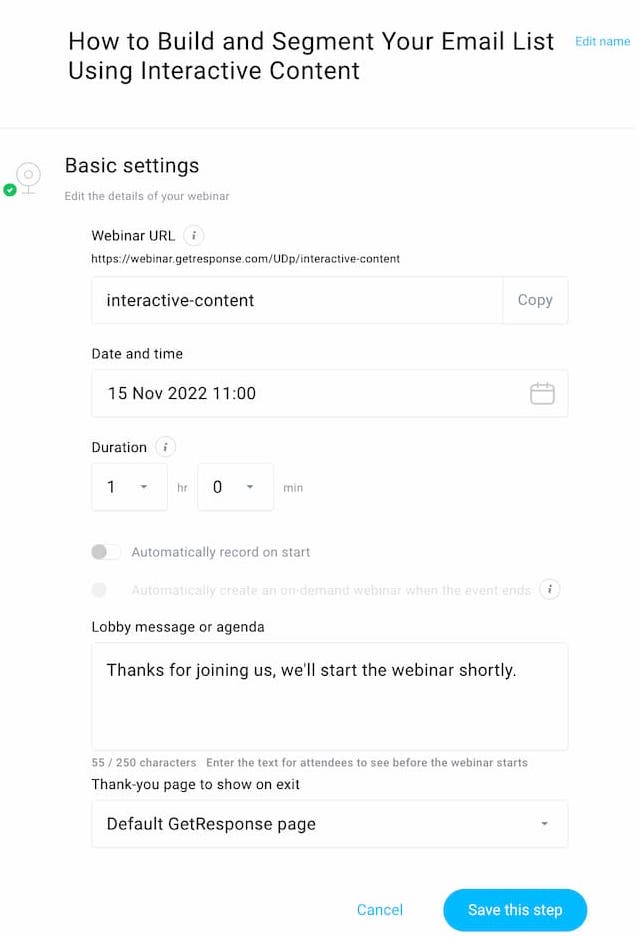
If it’s the first time you’re setting up a webinar in GetResponse, you’ll need to provide the following information:
- Title of the webinar
- Webinar URL
- Date and time
- Duration
- Whether or not you want to automatically start recording the webinar when it goes live
- Whether or not you want to automatically turn the webinar into an on-demand webinar once it ends
- Lobby messages visible to people who visit your webinar URL before the event goes live
- Landing page where webinar attendees will go after the webinar ends
Here’s what this looks like for one of our webinar campaigns:
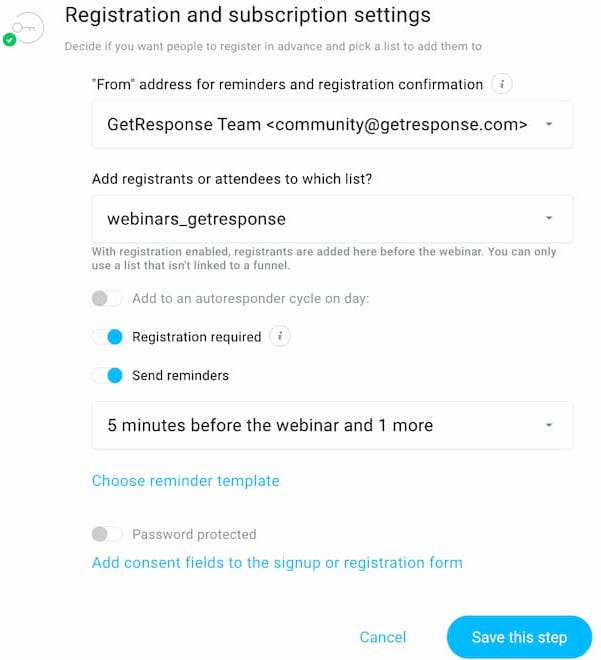
In addition, you’ll need to adjust your registration settings, including:
- The “from” address you’ll want to use to send the registration confirmation and reminders
- The email list your webinar registrants will be added to
- Whether or not you want to add the webinar registrants into an autoresponder series
- Whether or not you want the registration to be required
- What template you want to use for your webinar reminders
- How many webinar reminders you want to send before the event
- Whether or not you want to password protect and/or add consent fields to your webinar registration
Here’s what these settings look like for our webinar:
Adjusting the above settings may seem like a lot of effort, but as I mentioned, when you use the duplicate feature, it saves you roughly 90% of the work.
For our webinars, we usually only need to provide the title, date, and adjust the URL. We sometimes also use a custom thank you page for the webinar, but if we’re short on time, we use a generic page instead.
Pro tip 1: We always run webinars with the registration turned on, because we want to collect contact information from all the people interested in this event (including those that register, but don’t turn up to the event). If this setting was switched off, we would only be able to collect information about the people that entered the webinar room (live or on-demand).
Pro tip 2: We found that most of our webinar attendees stay with us for about 35-45 minutes, so we try to keep them under one hour long. Also, we see that we get the highest attendance rate when we send two to three reminders (One day before, one hour before, and five minutes before the webinar).
Additional content:
What is a webinar and how does it work?
How to create a webinar (video guide)
Step 3. Preparing the webinar registration page
Tools used: GetResponse Website Builder
Once we’ve created the webinar, it’s time to create the webinar registration page.
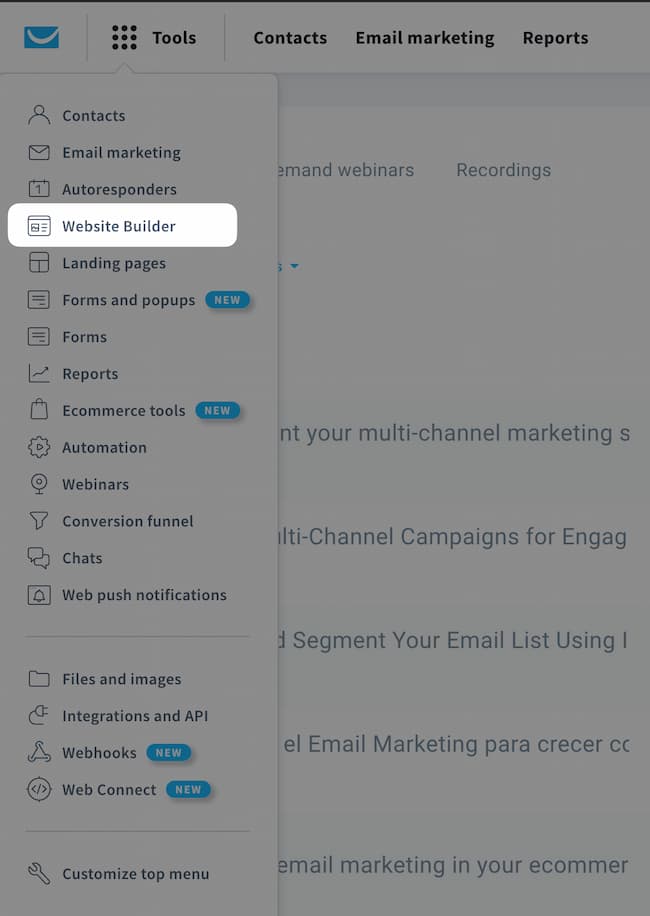
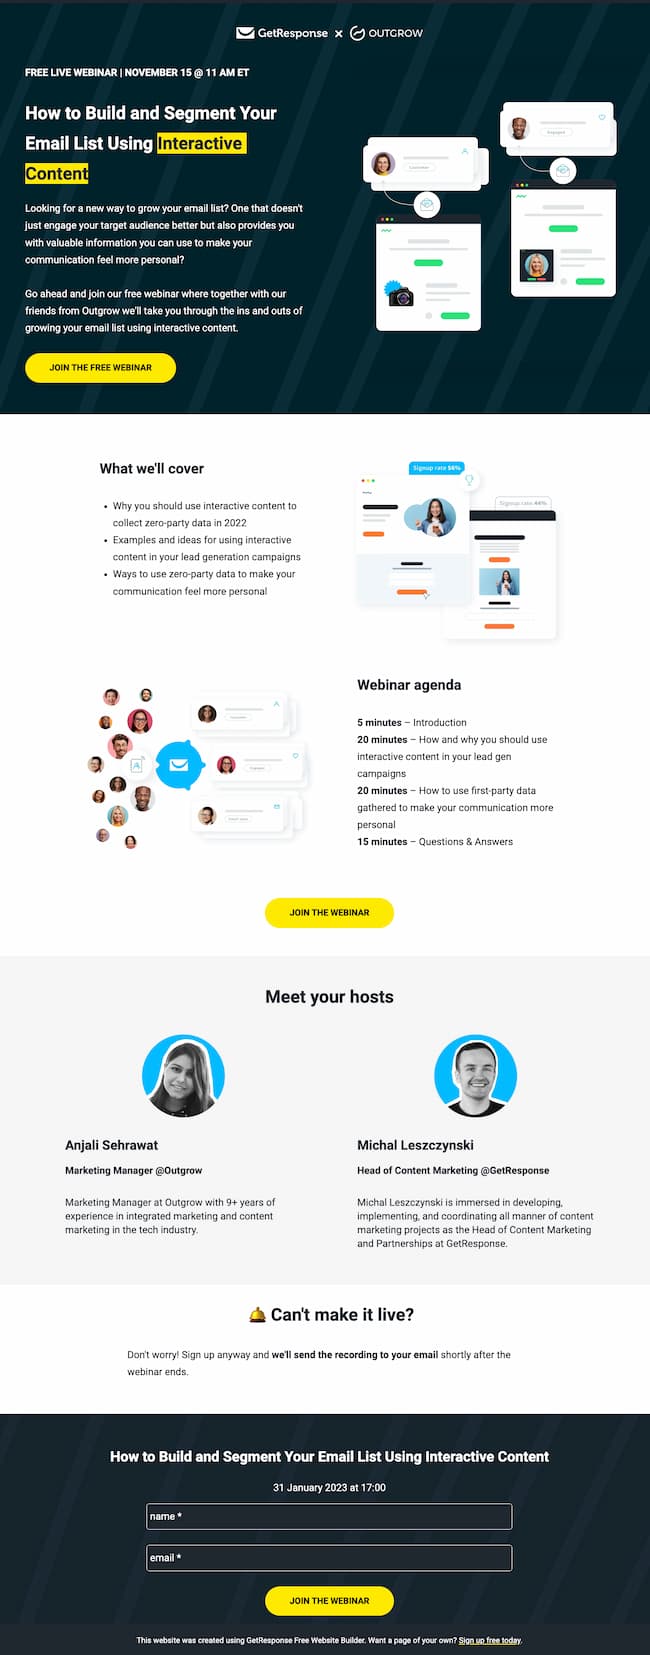
In theory, we could skip this step and send our users to the webinar registration URL we specified in the previous step. However, as we want to maximize our webinar signups, we prefer to create a custom webinar registration landing page that not only looks but also converts better. Plus, it helps us maintain the same brand identity across all channels.
To set up the webinar registration page, we’re using the GetResponse Website Builder. If you’ve never used the tool before, you’ll enjoy the intuitive drag-and-drop editor along with the slick prebuilt website templates that make the design process fast and easy.
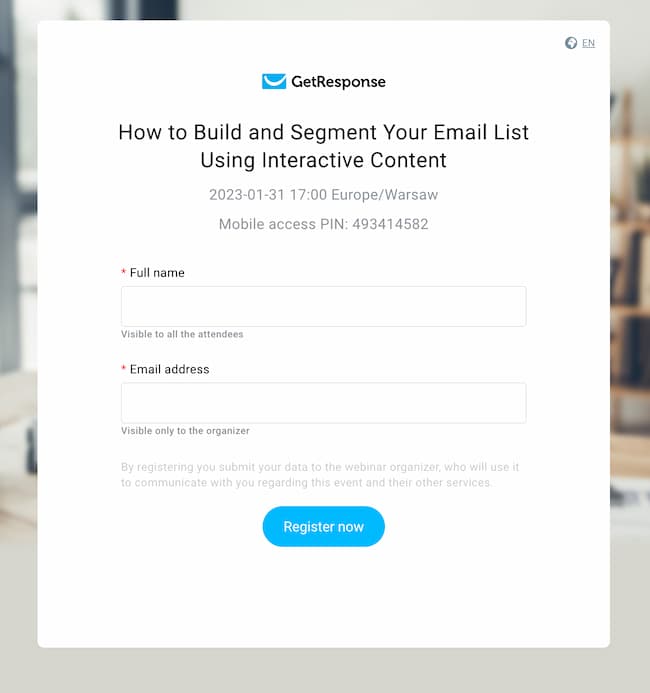
Using the Website Builder, we recreated one of the templates making sure to adjust the following elements
- Headline – it needs to be catchy and indicate the webinar title
- Subheading – it should strengthen the title
- Main body – it needs to explain all the necessary details, such as when the webinar takes place, what it’s about, what the takeaways will be, or who’ll be hosting it
- Images – they need to relate to the webinar topic
- Webinar registration form – it needs to register people for the right webinar
Note: The webinar registration form lets you choose from webinars that have already been created inside GetResponse and have the registration turned on.
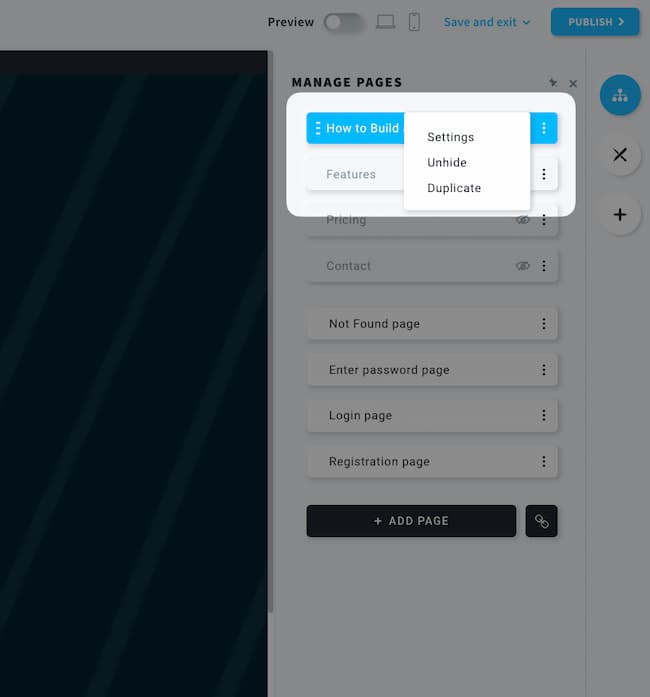
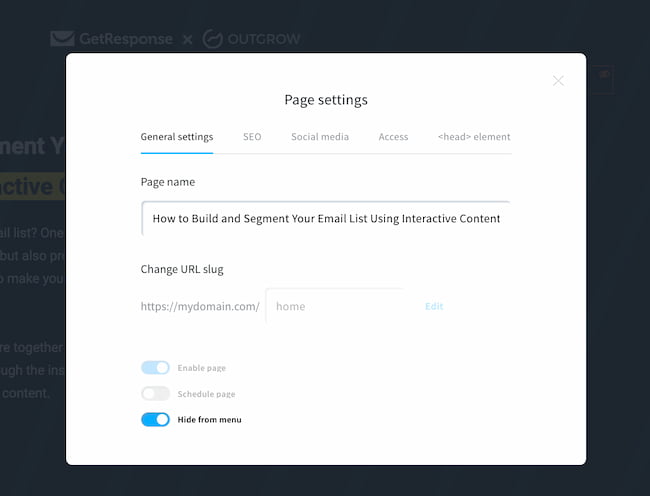
Once we’ve edited the page visually, we test what it looks like on desktop and mobile devices. Once we’re happy with the results, we head over to the page settings to adjust the final details, including the page title, page description, and the URL.
Let’s talk a bit about the URL.
GetResponse offers free domains to host your landing pages, but you can also use your own subdomain.
For the campaign we shared in this article, we used one of the free domains (grweb.site) and the webinar registration page URL was – https://interactive-content.grweb.site.
For other campaigns, we use our own subdomain – webinars.getresponse.com. In this setup, every time we create a new webinar campaign, we just create a new page and host it under the same subdomain (such as: webinars.getresponse.com/webinar-1). Usually, we prefer to use our own subdomain because it help us maintain brand identity throughout all the channels.
Pro tip: You can only have one website assigned to a single subdomain. That means for every webinar campaign you’d either need to assign a new subdomain or take down the previously published page. The workaround for this is to have one main website where each individual page will be dedicated to a different webinar.
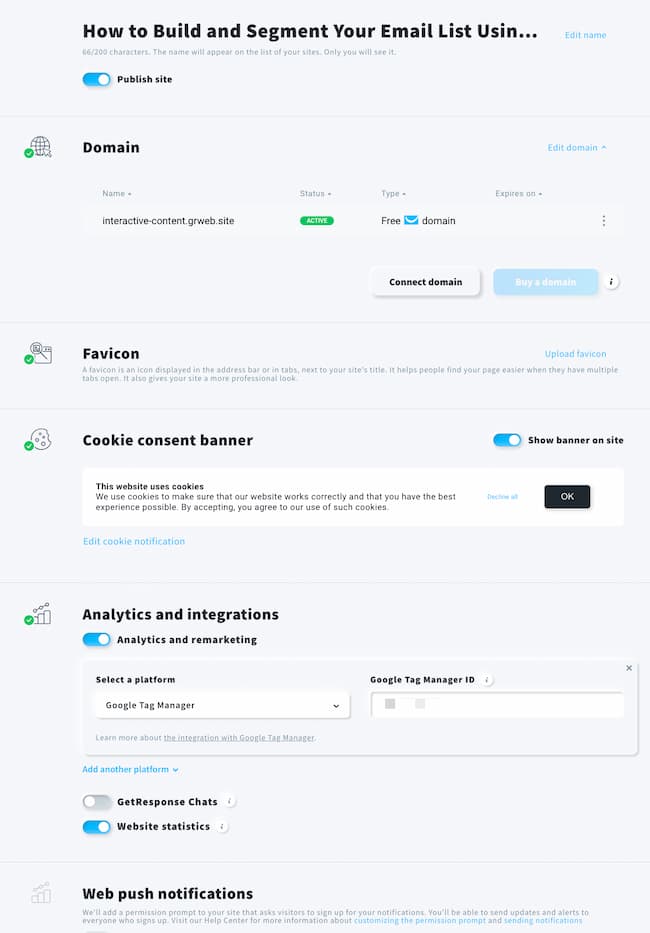
After we’ve finished designing the webinar registration page and filling out the title, description, and the URL, we make sure our page is integrated correctly with our Google Analytics account. This integration helps us see the performance of the page in the GA dashboard, along with all our other campaigns.
Here’s what this setup looks for our webinar registration page:
Additional content:
How to create high-performing webinar landing pages + examples
How to build a website from scratch (+ video guide)
How to create a website using templates (video guide)
Step 4. Sending the webinar invitation
Tools used: GetResponse Email Marketing
With the registration page live, we can start promoting the webinar to our audience.
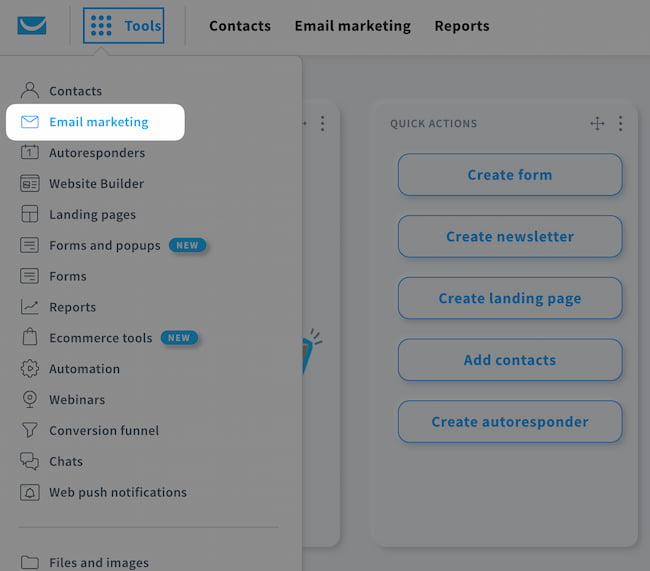
Since GetResponse is mostly known for its email marketing software, it’s natural that we’ll begin the promotional activities with emails.
We go to our email marketing tool, choose create newsletter, and start working on the webinar invitation email.
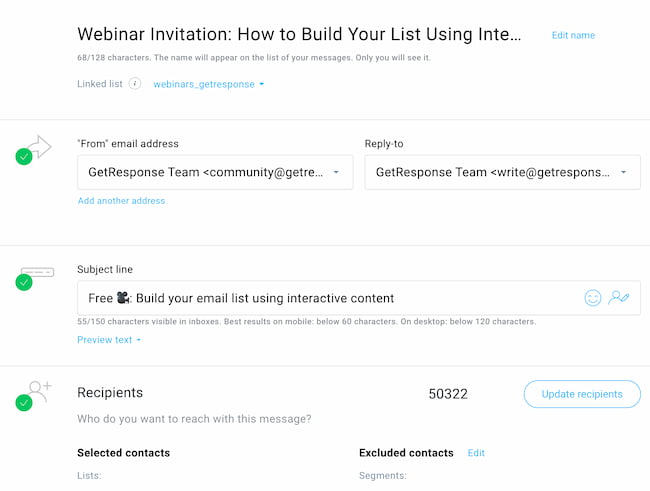
We start by naming the message, linking the relevant list for this campaign, choosing the appropriate “from” address, crafting the subject line, and choosing the recipients.
Example: If the webinar is meant for our English-speaking audience, we typically choose recipients only from our English-speaking lists, where you’d find all kinds of users – free account users, paid users, content subscribers, etc. At the same time, we make sure to exclude anyone who already registered for this event or may not be interested in it.
After that, we scroll down and head over to adjust the design and content of our message.
If you’re doing this for the first time, there are plenty of prebuilt email templates you can choose from. Just pick the one that you like the most, adjust the color scheme and fonts to match your branding, and start adding your content.
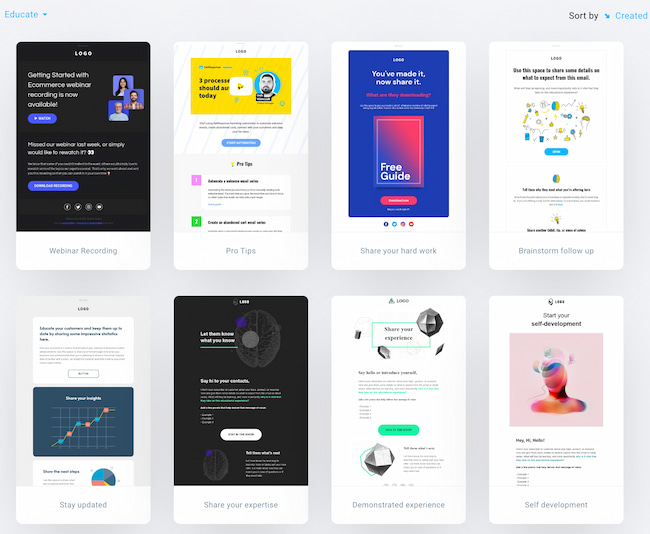
Since we’ve done this process multiple times, we go to the existing messages tab and reuse one of the webinar invitations we’ve sent in the past.
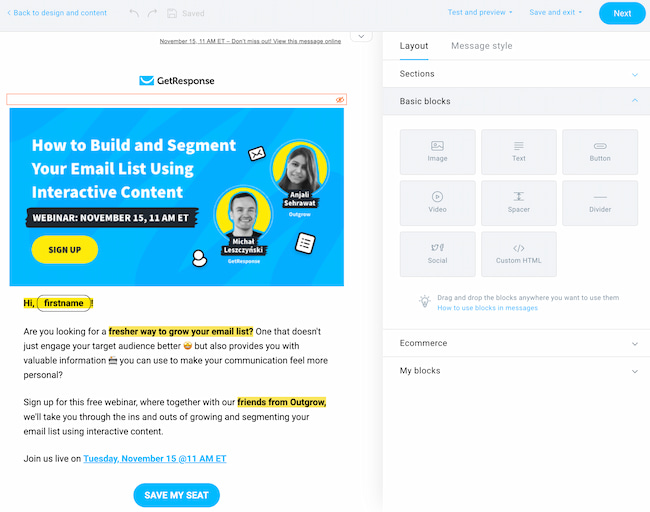
Inside the email creator, we make sure to add all the necessary details regarding our new webinar.
After we’ve edited the email, we click next, and head over to the tracking settings. There, we enable “Click tracking” and “Track link clicks with Google Analytics.”
Thanks to these settings, we’ll be able to better analyze the performance of our email campaign both inside GetResponse and Google Analytics.
Pro tip: In the Integrations tab inside your GetResponse account, you can customize what Google Analytics UTM parameters (source, medium, term, etc.) will be automatically added to your links. For our campaigns we use the following setup:
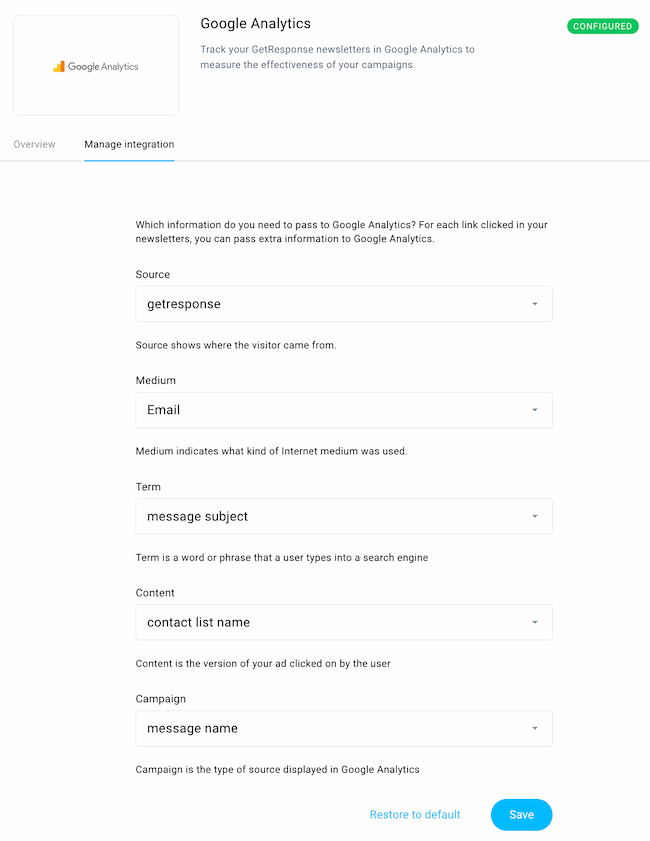
After all this work, the only thing left is to schedule the invitation email to the right audience at the right moment.
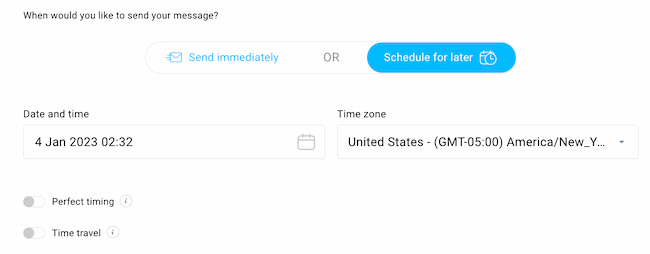
Pro tip: If you don’t know exactly when to send your email campaign, pick a time that you think is best for your audience and turn on the “Perfect timing” feature. This is what we use for most of our campaigns.
What this feature does is it looks at your individual subscribers’ historical behavior and automatically adjusts timing of the send out to maximize the chances of your emails getting opened.
Additional content:
How to design a webinar invitation email
How to create a newsletter (video guide)
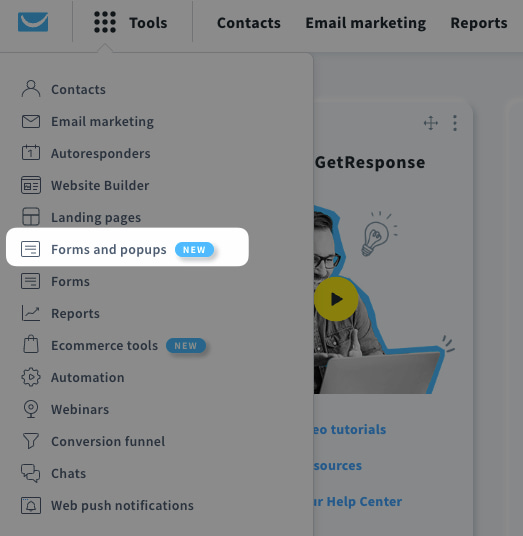
Tools used: GetResponse Forms and Popups
The next step is to create a popup that’ll announce the webinar to our website audience.
Our website is visited by thousands of visitors every day. By publishing a popup on our pages, we can reach that audience without spending any extra money.
We head over to the forms and popups tool, where we create a new popup or duplicate an existing one.
If you’re doing this for the first time, you can start by picking one of many prebuilt templates and customize its design to match your branding.
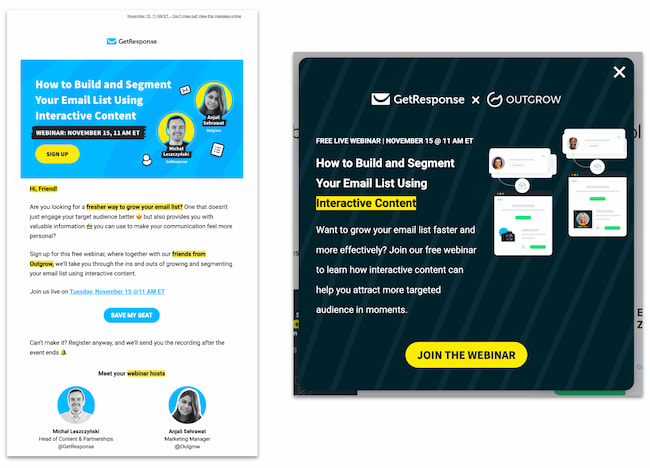
Here’s what our popup looks like:
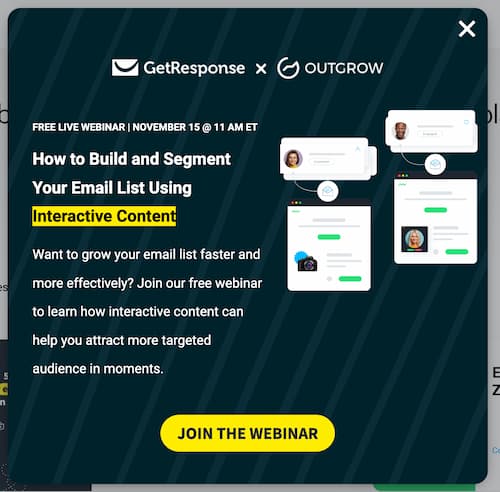
Once we’ve designed the popup, we turn to the settings, where we can decide how and where our prompt will be shown.
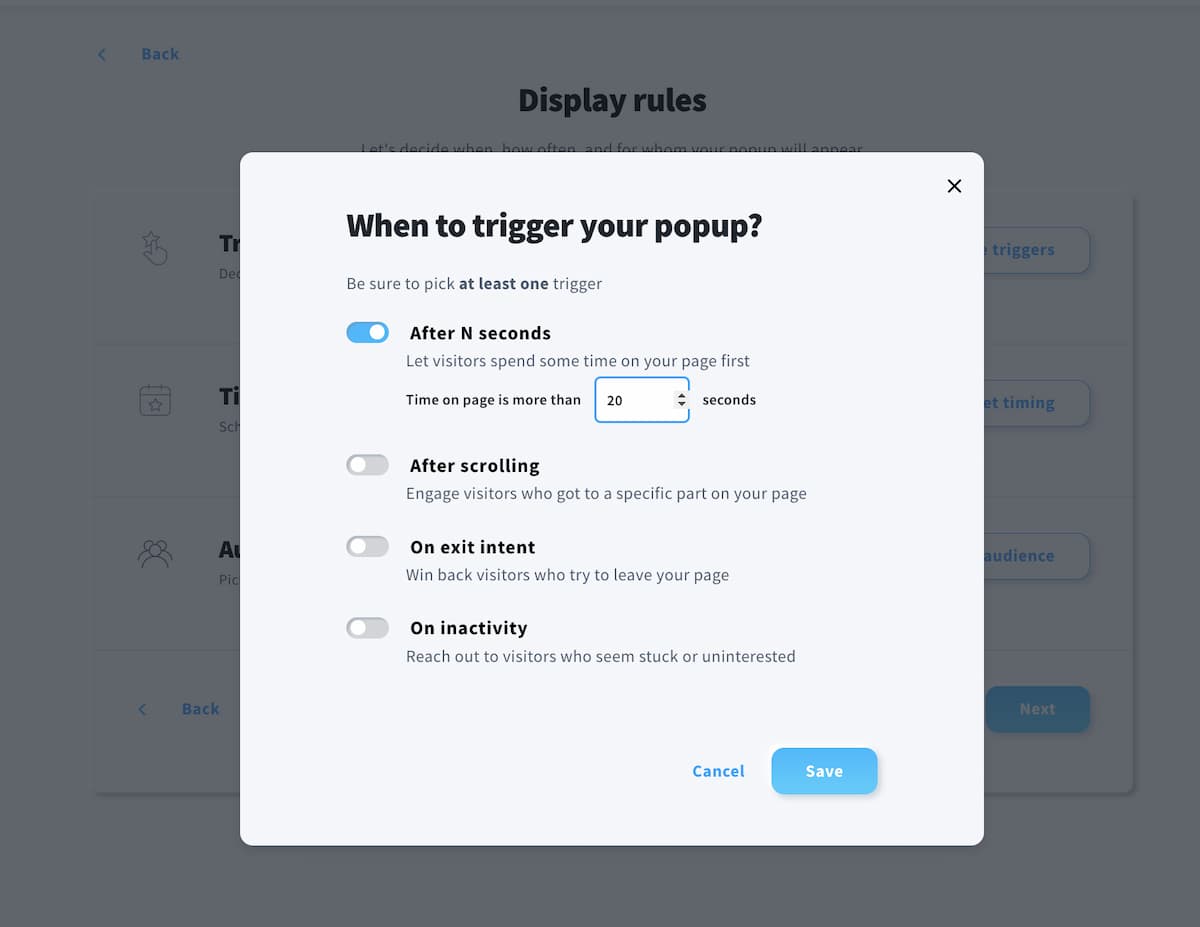
If you want maximum reach, you can show it to everyone who visits your website and stays on it for, say, 10 seconds.
If you want to be more precise, you can show it only on particular pages or to people who’ve engaged with your website in a more meaningful way (for example, they scrolled through 50% of your page).
Once you’re happy with your targeting, all you need to do is install a line of JavaScript code on your website (don’t worry, you don’t have to write this yourself). This is a one-time process, and once you do it, you’ll be able to publish as many popups on your pages as you want. You can see what this process looks like in the following video:
Additional content:
What are popups? Definition, types, and examples
How to create a popup in 5 easy steps
Tools used: Social media platforms, Paid ads
Depending on how much time we’ve got at our disposal, we turn to other promotional channels – social media, partners, and paid ads.
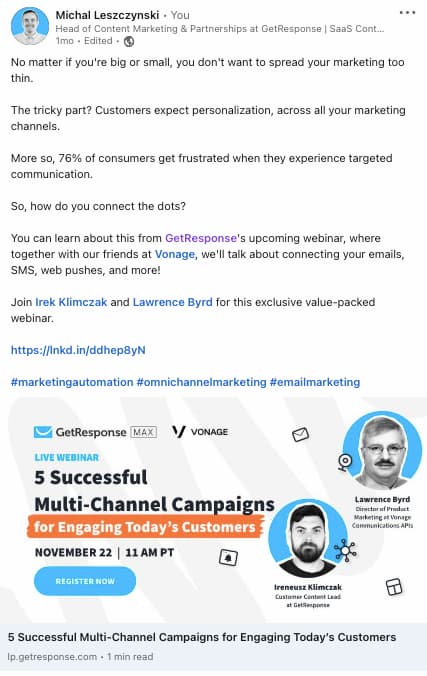
For social media, we ask our webinar hosts and colleagues to invite their own social media followers to join the upcoming live webinar. Typically, they publish a post once or twice on LinkedIn or Twitter. Depending on where they’re most active.
Here’s an example of such a post:
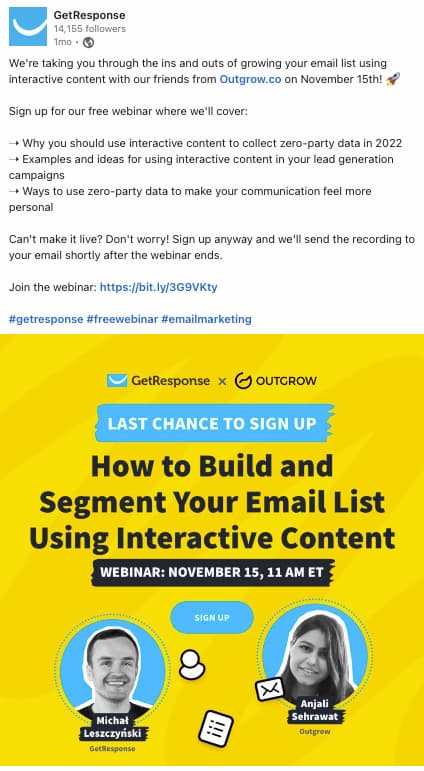
In addition, our Social Media Team also announces the webinar using our company profiles. They do it typically via organic posts and reels on Instagram and LinkedIn.
Here’s one example:
If we’re running the webinar with a partner or have secured some other partnership agreement, we also ask other brands to promote the upcoming webinar. They do this either via social media post, a newsletter mention, or a banner ad on their website.
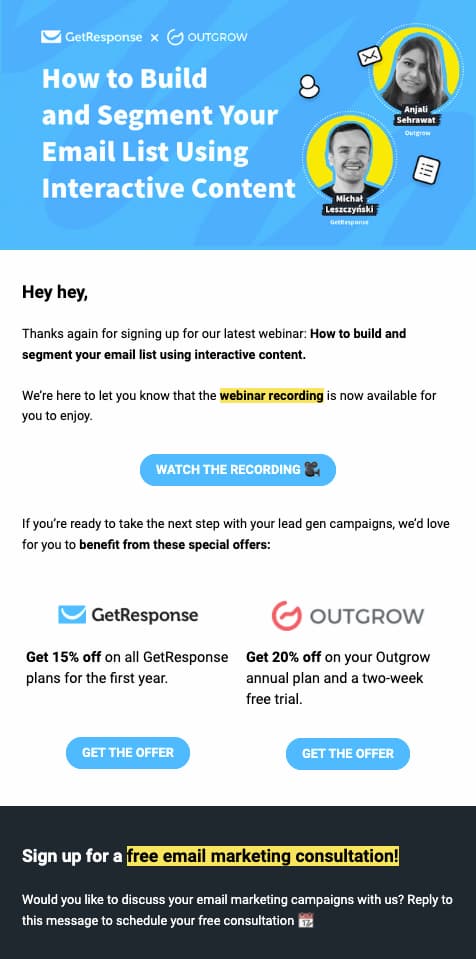
Here’s an example of an email our partner, Outgrow, sent to their audience.
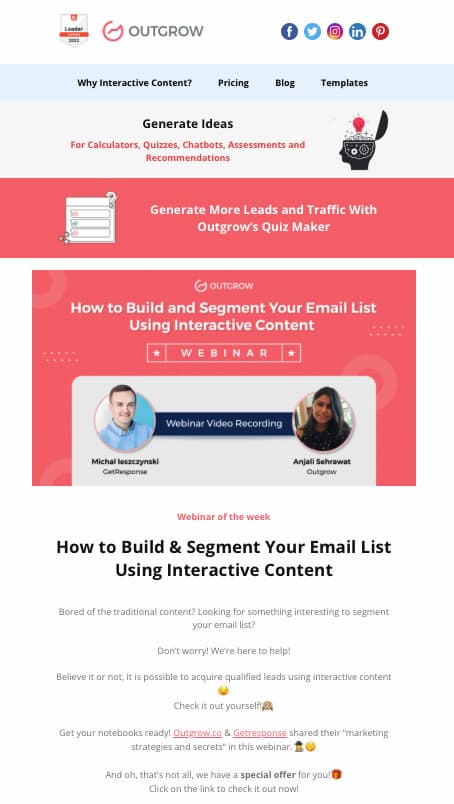
So far, dedicated newsletters to our partners’ audience have worked best, but this usually requires more syncing with the other brands’ team. In such situations, we need to provide them with the whole email template or at least the copy, banners, and links.
Finally, when we’ve got more time and budget on our hands, we turn to paid ads. Usually, we promote our webinars via Facebook and Google ads. Sometimes, however, when we’re trying to reach a very precise B2B audience, we also invest in LinkedIn ads.
Full disclosure: We run most of our paid ad campaigns natively via Facebook, Google, or LinkedIn ad management tools because we have a dedicated team that manages the campaigns for us. However, if we were to do this on our own, we’d run paid ads directly via the GetResponse Paid Ads tool. While it may not have as many advanced options as the native ad tools, it’s more user-friendly and it’s directly integrated with our other marketing tools.
Paid campaigns have the highest reach, but you’ve got to be very precise about your targeting. In some campaigns we’ve managed to generate webinar signups for as little as $4 per lead while in others we’ve spent as much as $20 per contact.
Having said this, we continue to invest in paid ads for our most important webinar campaigns, while trying to refine our process (assets, copy, targeting) to achieve the most optimum cost per lead.
Here’s an example of a banner we used to promote our recent on-demand webinar.
Additional content:
How to create Facebook ads in GetResponse
How to create Google ads in GetResponse
Step 7. Running the webinar
Tools used: GetResponse Webinars
With all the promotional activities completed, it’s time to go live!
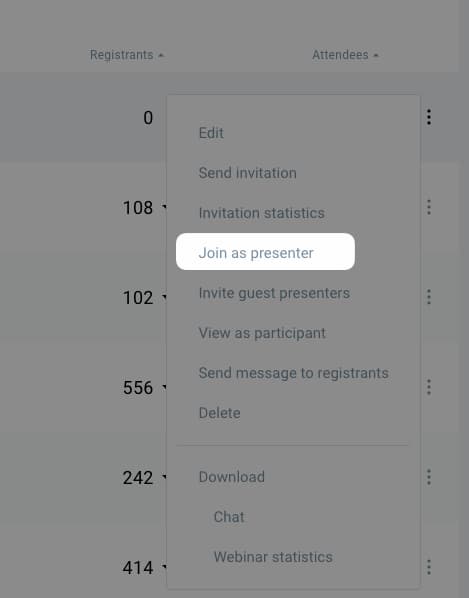
We head over to the Webinars tab, hover over the kebab menu on the right, and click “Join as presenter.”
After providing our name, we enter the room where we can test and prepare everything before going live.
The following video shows you what this process looks like:
Typically, we reserve 30 minutes for testing and customizing the webinar room. During that time, we:
- Upload our presentation
- Test the camera and microphone setup
- Test the screen sharing
- Turn on the Q&A mode
- Prepare any surveys and CTAs we want to show during the webinar
Pro tip: If you want to test the webinar with another presenter or guest, ask them to register for the webinar and enter the lobby. From there, you’ll be able to move them to the webinar room and give them presenter access.
With everything running and on schedule, we go live and make sure the webinar recording is turned on.
As I mentioned a bit earlier, the main part of our webinar takes about 35 to 45 minutes. We also make sure to leave about 15 minutes for a live Q&A session.
After giving the presentation, we close the webinar for everyone. After this, they should be redirected to the thank you page we specified in Step 2.
Step 8. Sending the follow-up
Tools used: GetResponse Email Marketing or Marketing Automation
The last step in our webinar campaign is the follow up after the event has already aired.
Usually, we send out one or two emails to everyone who registered for the webinar, where we include:
- A thank you message for showing interest in the event
- Link to the webinar recording
- Additional materials mentioned during the webinar
- Future steps or content they might be interested in
Most of the time, we do this by hand. Simply by sending out a newsletter to the appropriate segment of people.
Here’s an example one of such message and how it performed:

For more robust campaigns, we do this process using our Marketing Automation tool.
There, we can prepare several follow-up sequences to individual customer segments (people who attended the webinar vs. those who only registered).
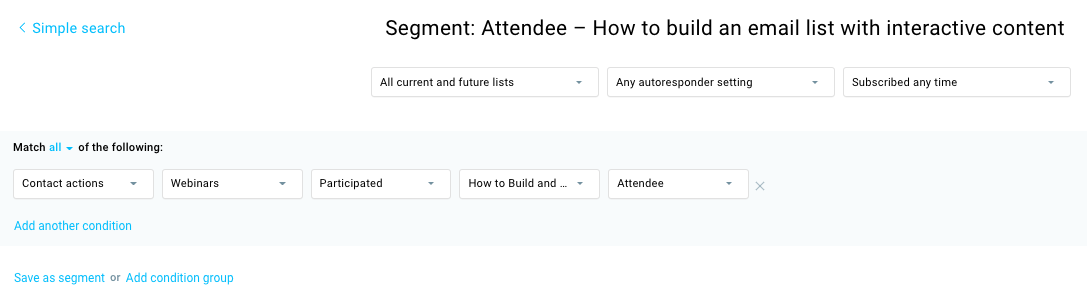
Here’s an example of a simple workflow that’d split up your audience based on whether they’ve attended the webinar or not. From there, you can expand it e.g. to see if any of them converted, visited a particular page, or watched the recording.
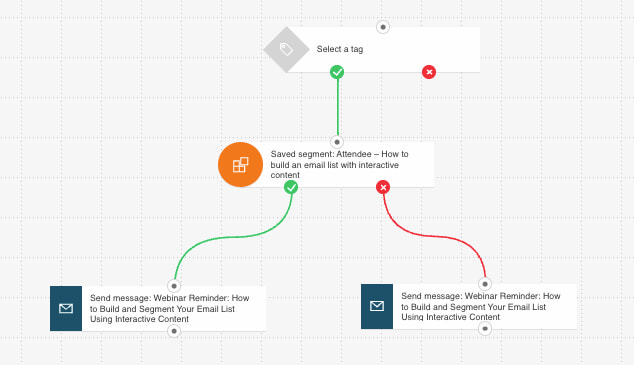
And here are the segment settings you need to use to prepare such a segment in your Contacts list.
Time to plan your next webinar marketing campaign
Webinars are an important part of how we reach, engage, and sell to our B2B audience.
Our most successful webinar so far attracted more than 4,000 registrants and had around 1,000 live attendees.
How did we achieve this result? By following the exact same process we just laid out in this article.
Now that you know our secret sauce, I’m confident you’ll be able to succeed using webinars, too.
So why not go ahead and start planning your next webinar marketing campaign?
And if you ever need any guidance, feel free to reach out to our award-winning Customer Support Team, available to you 24/7.
[ad_2]
Source link


