
As a social media manager, you’re responsible for much more than just posting on Facebook or Twitter. Instead, you have to manage everything from brainstorming content to social media scheduling to analyzing results.
That means you need a robust publishing tool for social media where you can oversee the entire process from initial concept to completed campaign. Whether you work with an internal team or for a social media agency, your platform of choice also needs collaboration tools.
That’s a tall order. So what’s the best option for a social media manager with high standards?
With Agorapulse, you can organize social media content, schedule posts, collaborate seamlessly, and produce insightful reports. Find out how to manage all your social media content in one place using Agorapulse.
Manage Social Media Scheduling
When you use Agorapulse for social media scheduling, you can publish right away, save for later, or reshare on multiple dates. There are good reasons to choose each option.
Publish social media content
Did your boss or client ask you to create a last-minute post right away? Do you want to share breaking news or timely information with your followers? You can publish content instantly using Agorapulse.
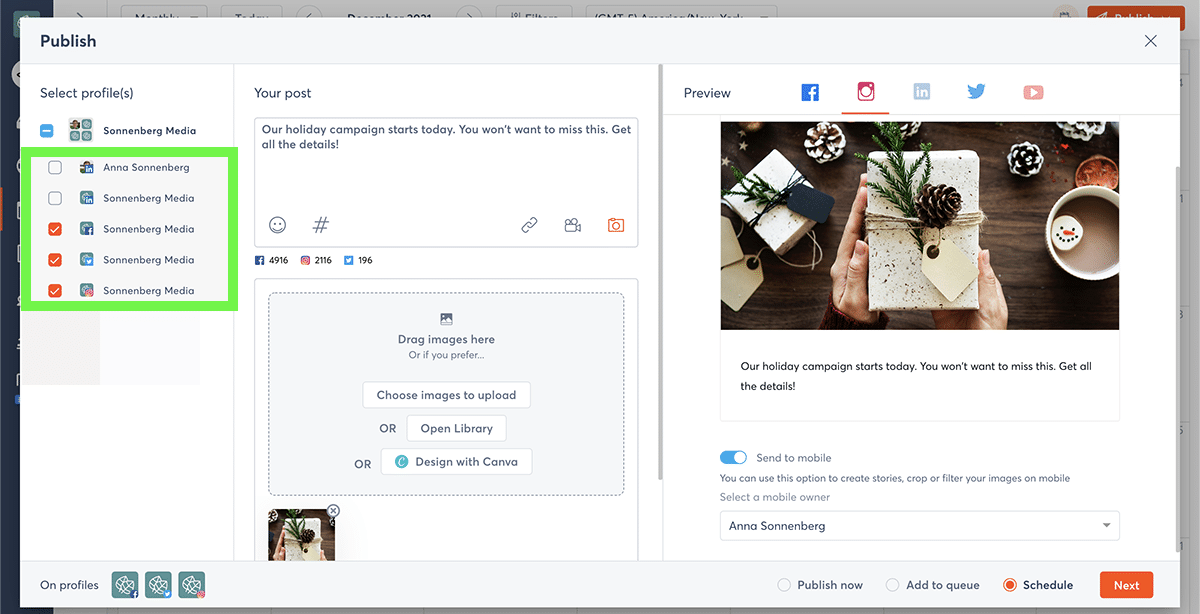
Open Agorapulse and click the Publish icon in the upper left corner. Select the profiles where you want the post to display. Then type a caption and add a link or a creative asset.
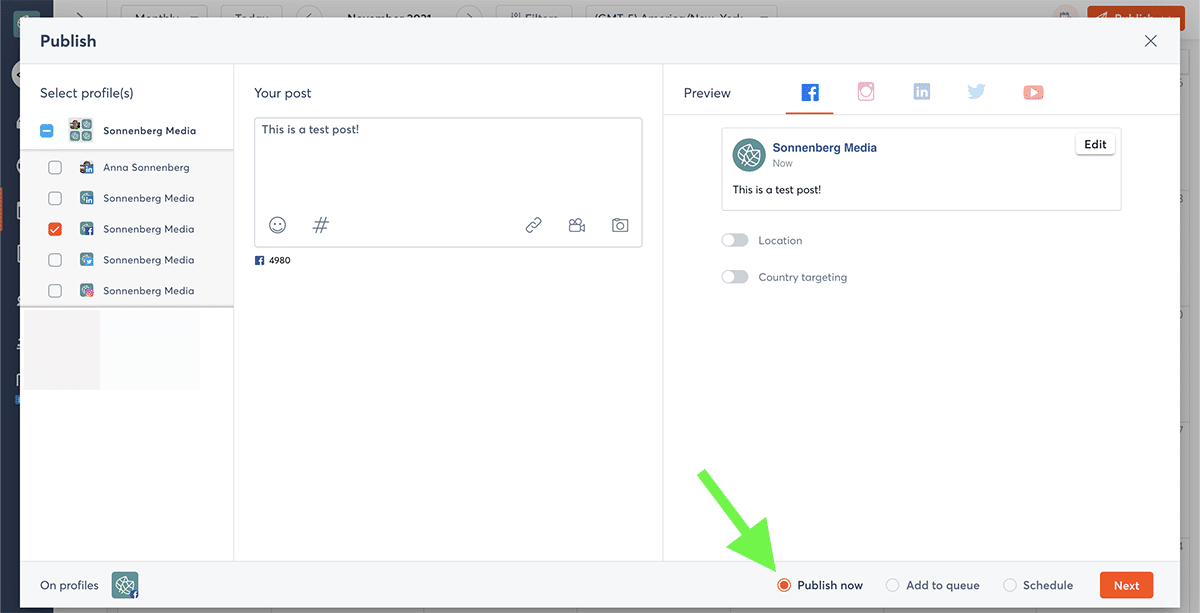
Quickly scan the preview for each channel. Then select Publish now and click the orange Next button. On the next screen, you have the option to add publishing or campaign labels to organize your content. Then you can either publish the content instantly or assign it for approval.
Schedule social media content
Whether you’re planning one-off posts or a complex campaign, batching content creation and scheduling often helps you work more efficiently.
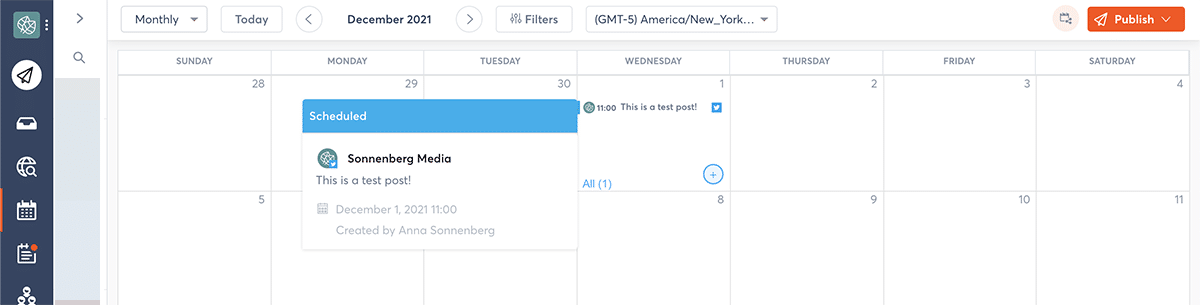
To plan content in advance, start creating a post using the same workflow as above.
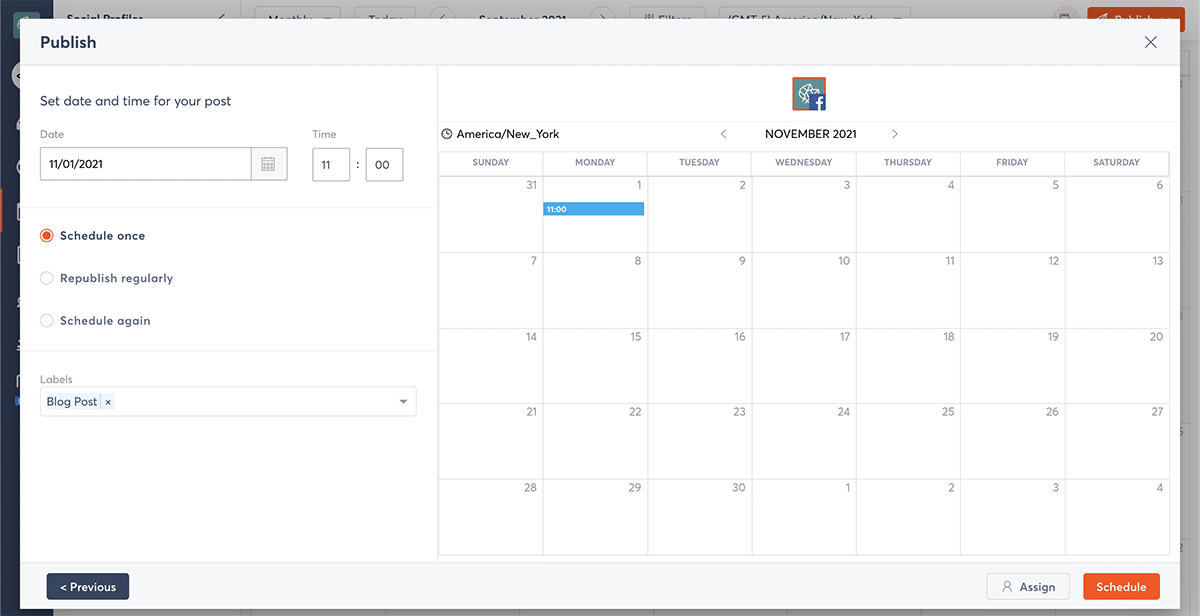
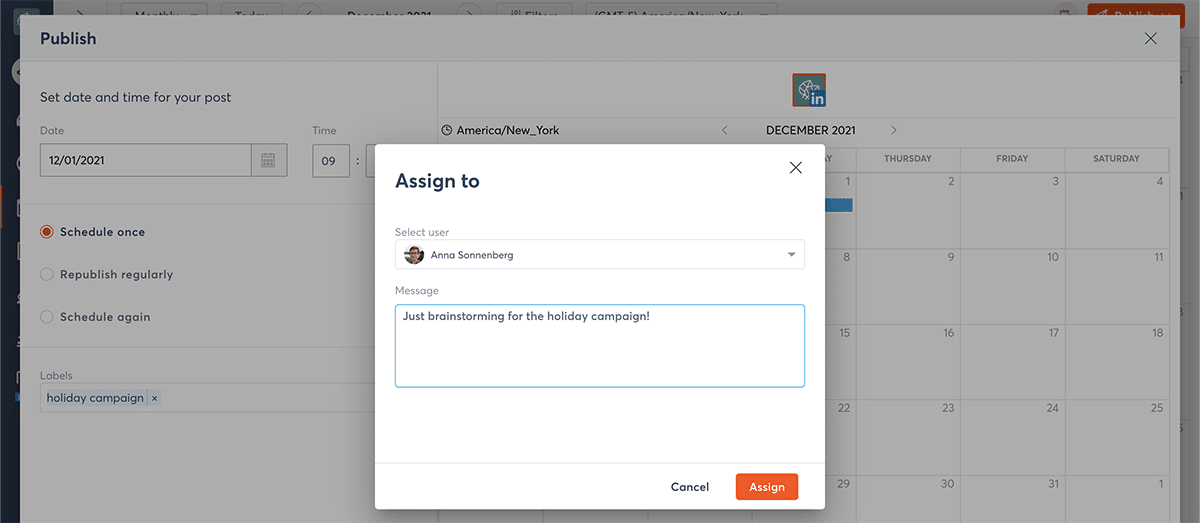
This time, select Schedule and click the orange Next button. On the next screen, add any applicable publishing or campaign labels and choose the time and date for the post to go live. Then click the orange Schedule button to complete the process or assign it for approval.
Reschedule posts for multiple dates
It’s usually best to create totally unique social media posts. After all, your followers are likely to get tired of hearing or seeing the same message over and over.
At the same time, there are some great reasons to schedule a post more than once.
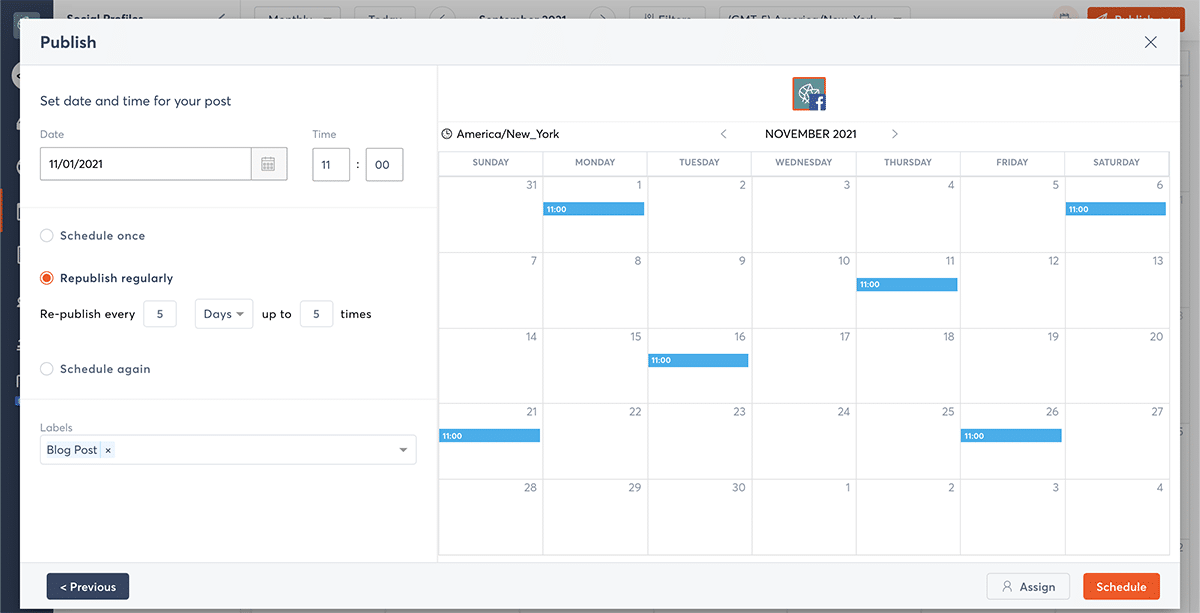
For example, evergreen content never goes out of style. Resharing a great post every few weeks or months can continue to provide value to your followers.

The Agorapulse publisher makes it easy to publish content more than once. Rather than scheduling content for a single date, choose Republish regularly. Then choose how often and how many times to republish.
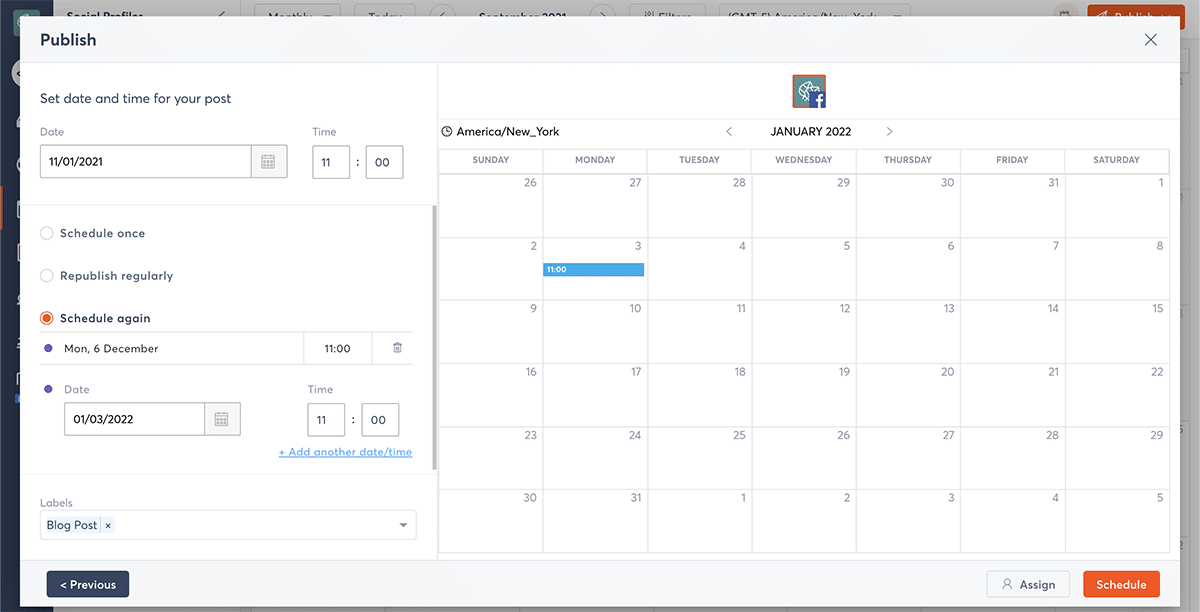
If you want more control over when to republish, choose Schedule again. For example, you may want to republish on the first Monday of every month or at more random intervals. Choose as many times as you want to republish and click the orange Schedule button.
Keep in mind you can always edit or delete any scheduled posts. Locate the post on your publishing calendar and click to edit. Then make any changes to the content or timing and click the orange Save changes button.
Alternatively, click the red Delete post button to remove it from your schedule.
Collaborate With Social Media Teams
If you’re a team of one, then your social media scheduling workflow is probably pretty streamlined. But if you have colleagues or agency clients, you need a publishing tool for social media that allows for collaboration.
Agorapulse has options for both.
Assign content to colleagues
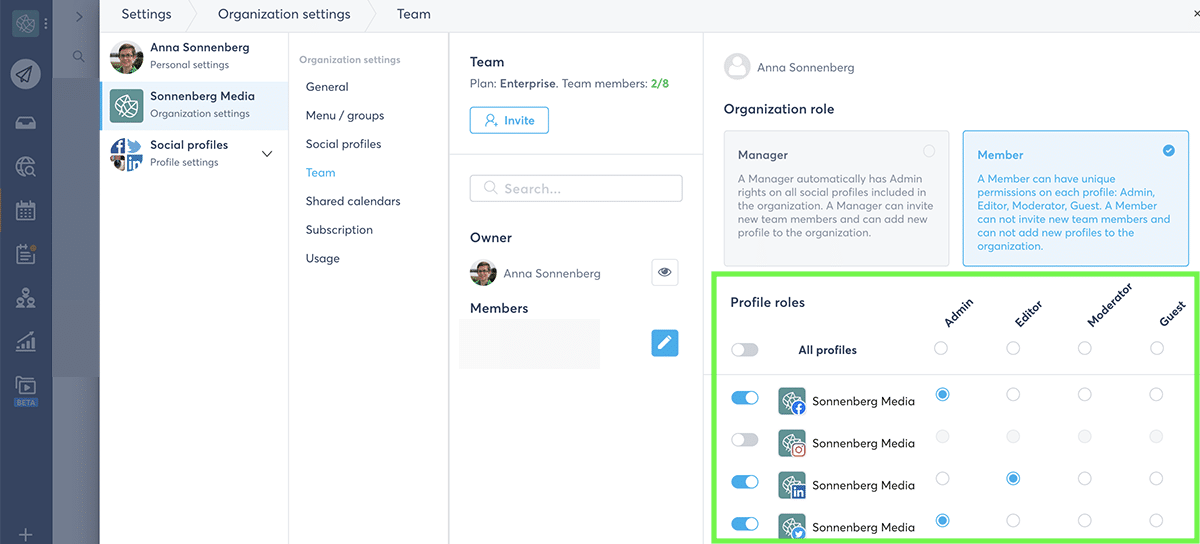
First, make sure your coworkers have permission to access the right profiles. Open your organization settings in Agorapulse and select a team member.
Review their profile roles and make any necessary updates.
To get your coworkers to weigh in on social media content, create a post for immediate publication or for a later date. Rather than pressing the orange Schedule or Publish button, click the gray Assign button.
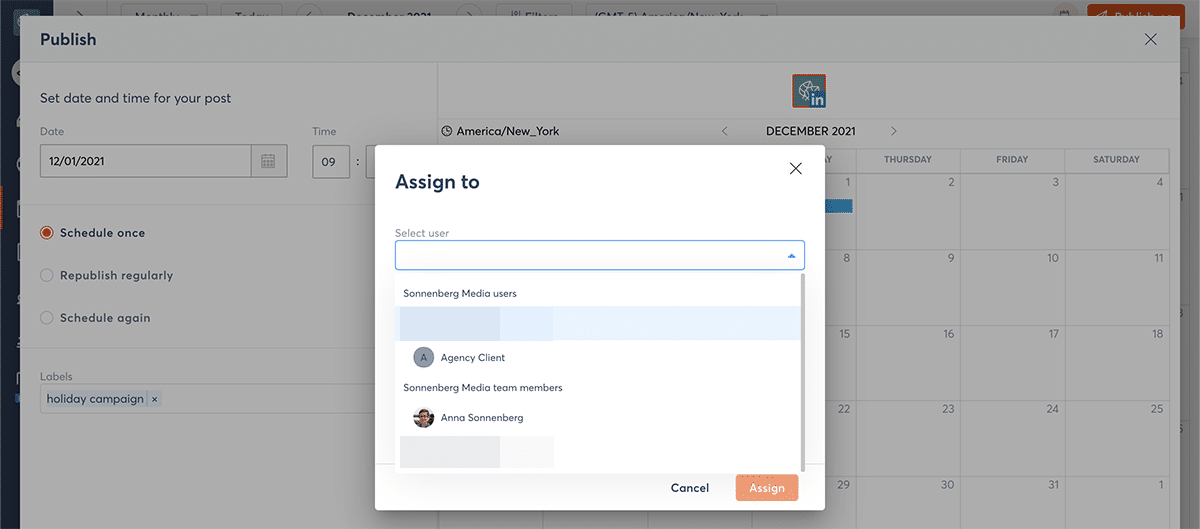
Then use the dropdown menu to select a team member. Add an optional message and click the orange Assign button. Your colleague can then edit the post, approve it, or reject it and return it to you for more edits.
Get approval from clients
If you need client input on social media posts, you don’t have to worry about adding them as Agorapulse users. Instead, go to your organization settings and create a Shared Calendar. Input client email addresses and select the profiles you want to connect to the calendar.
How to Create a Social Media Calendar That Works
Your clients will receive an email notification, inviting them to complete the setup process. They can use the Shared Calendar link to review any published or scheduled content at any time. If you assign a post for approval, your clients can review, comment, and approve directly from the Shared Calendar.
To get client input, create a new post using your Agorapulse publishing calendar. To assign the post for client approval, use the dropdown menu to select a client who has access to the profile’s Shared Calendar.
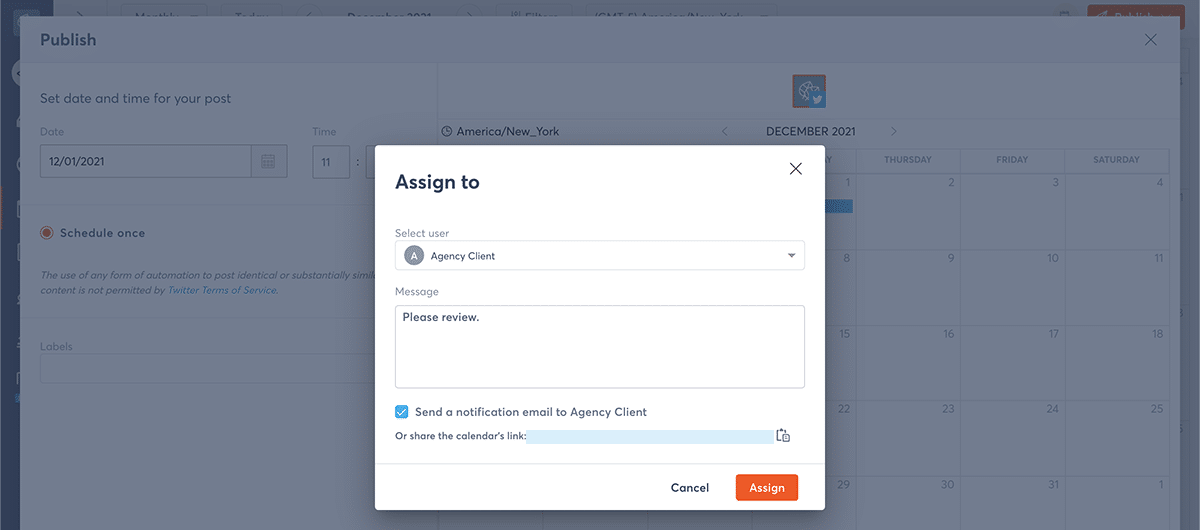
You can add an optional message and choose whether to send a notification email to your client. From there, your client can approve or reject the post. The content won’t go live until your client or someone on your team manually approves the post.
Brainstorm and Plan Social Media Content
In an ideal world, social media content would materialize out of thin air, so you could schedule or publish it immediately. In reality, however, creating great posts for social media requires a lot of brainstorming and planning.
When you use Agorapulse, it’s much easier to plan social media campaigns independently or with a team. With a simple workflow, you can draft ideas and organize content.
Brainstorm campaign ideas
Maybe you’re planning for a big product launch. Or perhaps you’re looking ahead to a major holiday season. Either way, you’ll have some campaign ideas in various stages of completion.
If you’re ready to create assets and schedule content, skip ahead to the organization part of the process. But if you’re still very much in the brainstorming part of the process, here’s what to do.
In your Agorapulse publishing calendar, choose the profile(s) where you want to add campaign ideas. Hover over a tentative date and click on the plus sign. You can always change the date later, so don’t worry too much about setting anything in stone.
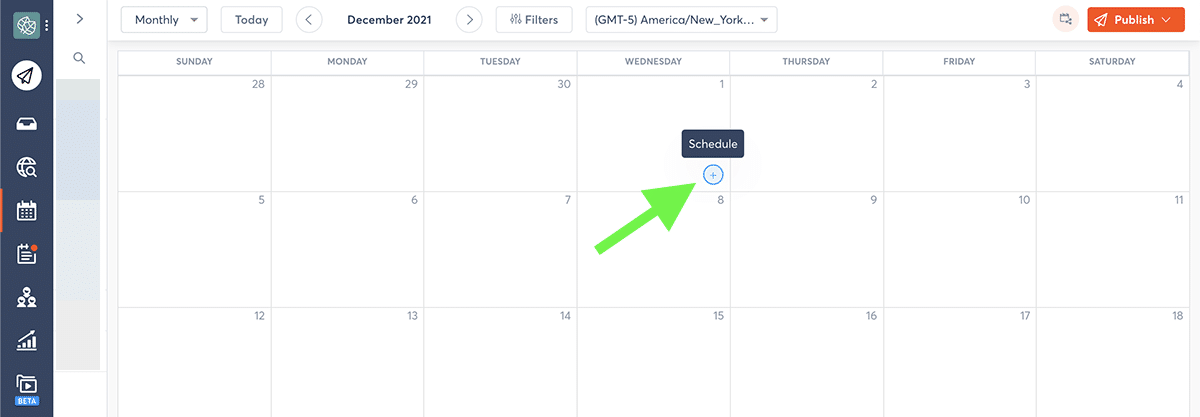
Next, type your idea.
You can be as detailed or as vague as you want. You can also attach a potential image, video, or link. Remember, this is for your own internal use only. Make sure Schedule is selected and press the orange Next button.
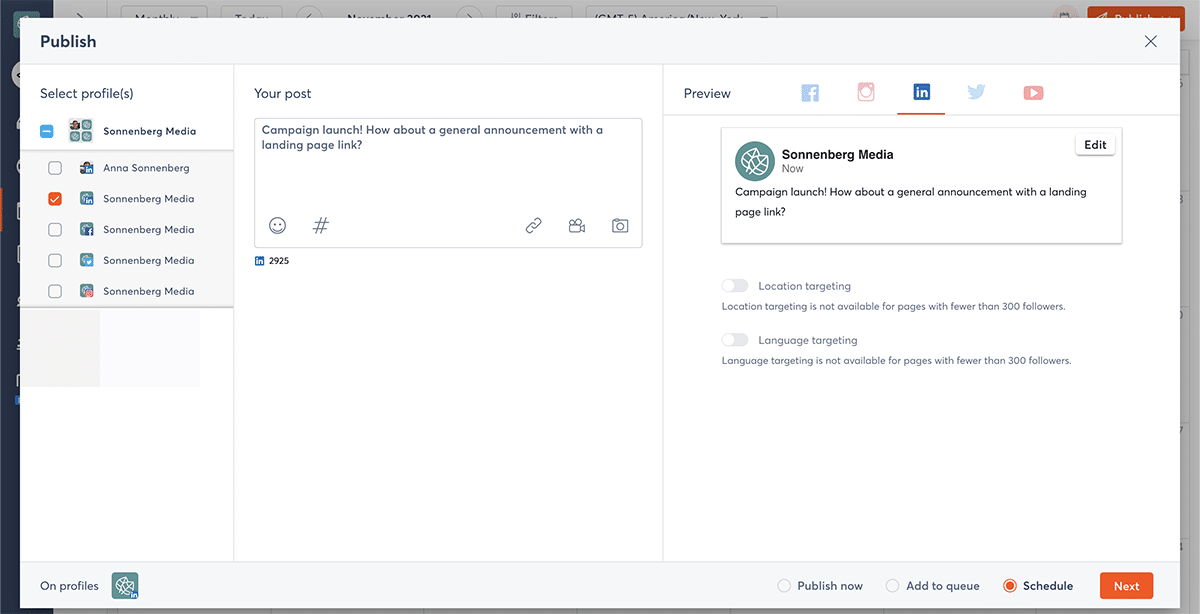
To make tracking your ideas a little easier, add a label to the post. If you haven’t created a campaign label yet, you can always add one in the settings for each social profile and then tag your drafts retroactively.
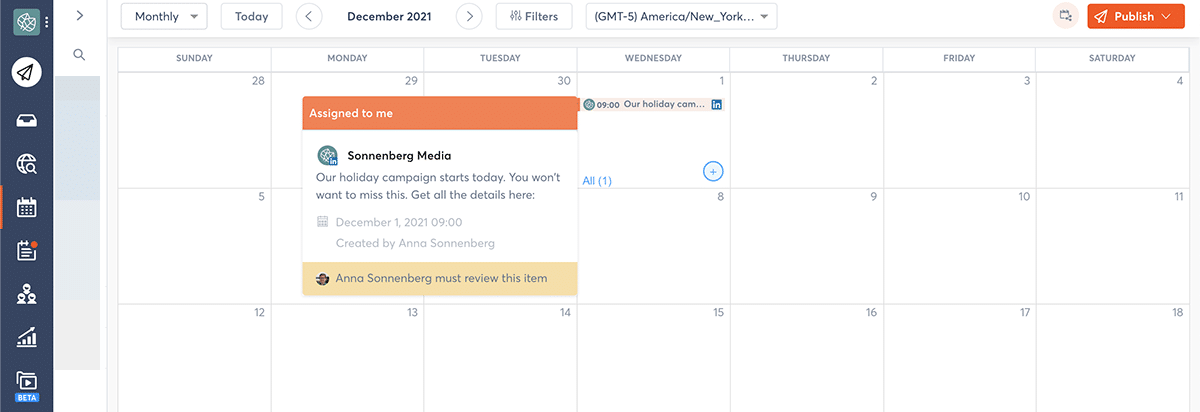
Rather than scheduling your brainstorming post, click the gray Assign button. Then click the dropdown menu to see a full list of your team members and people who have access to your Shared Calendar.
Assign the draft to someone. If you’re just making notes for yourself, you can simply assign it to yourself. If you want to get input from a coworker or client, assign it to another person instead. Then click the orange Send for approval button.
Collaborate on post drafts
Are you ready to finish planning that social media campaign? You can find all the draft posts you created on your Publishing Calendar, where they’re highlighted in orange.
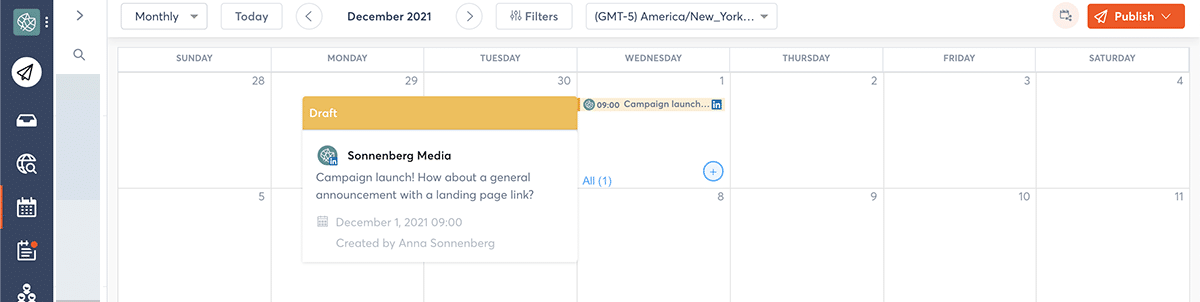
To update a draft post, locate it on your Publishing Calendar and click to edit. You can change the caption, add hashtags, upload photos and videos, or attach links. You can also change the publication date and time or add and remove labels.
Do you want to see if teammates or clients commented on your draft? Click the blue Show history link to review comments.
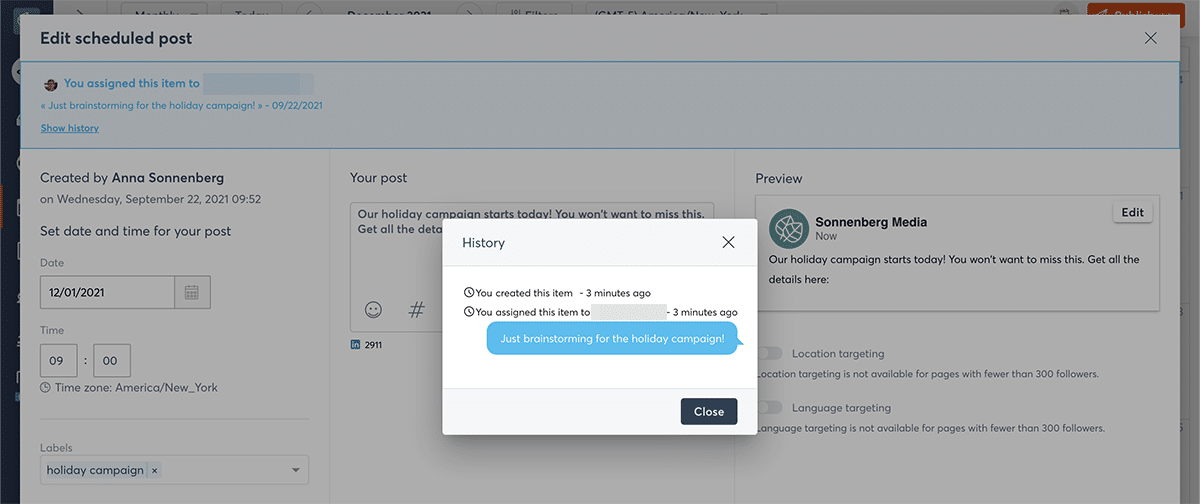
If you’re ready to schedule the post, click the arrow next to the orange Reassign to button. Then select Save and approve to complete the process.
But if you’d rather keep the post in draft mode, select Send for approval instead. Alternatively, you can click the orange Reassign to button to send the post to another team member instead. When reassigning, you can add another comment to the conversation.
Organize Social Media Assets
When you work with a team, keeping track of social media assets isn’t always easy. Unless your team is incredibly diligent, it’s tough to know what’s final or approved for social media use.
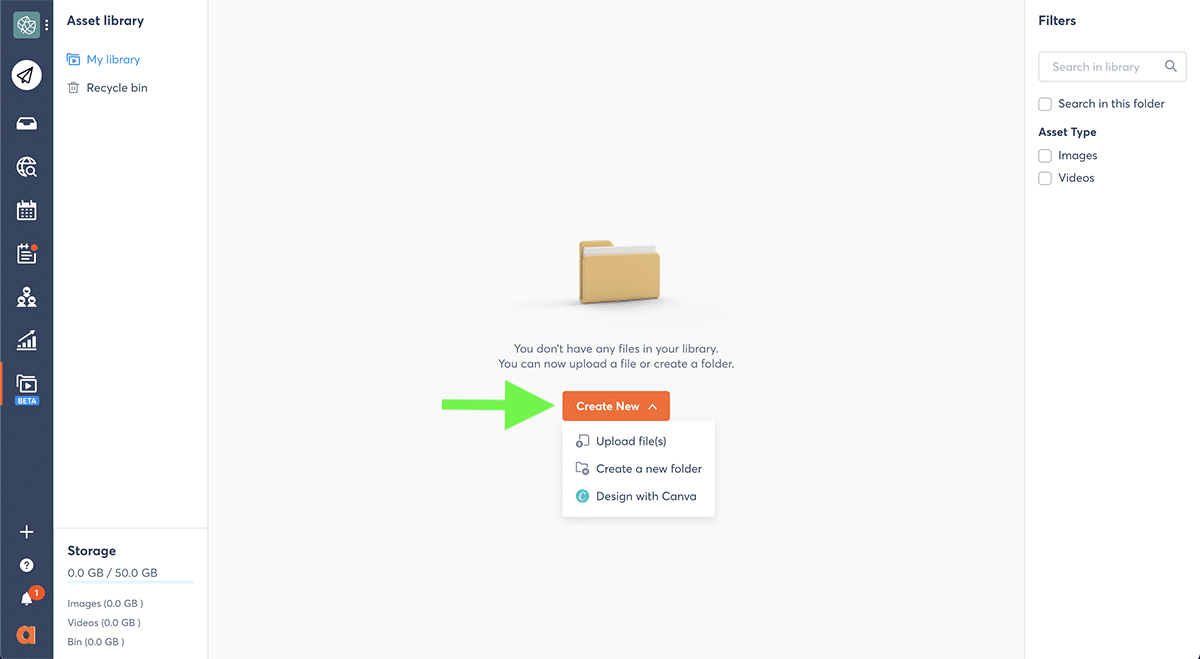
With Agorapulse’s asset library, organizing images and videos is so much easier. To access your asset library, navigate to the Library in Agorapulse.
Upload and store assets
You can add assets to your library by clicking the orange Create New button. From there, you can create a folder (with subfolders!) for your campaign or start dragging and dropping assets onto the window.
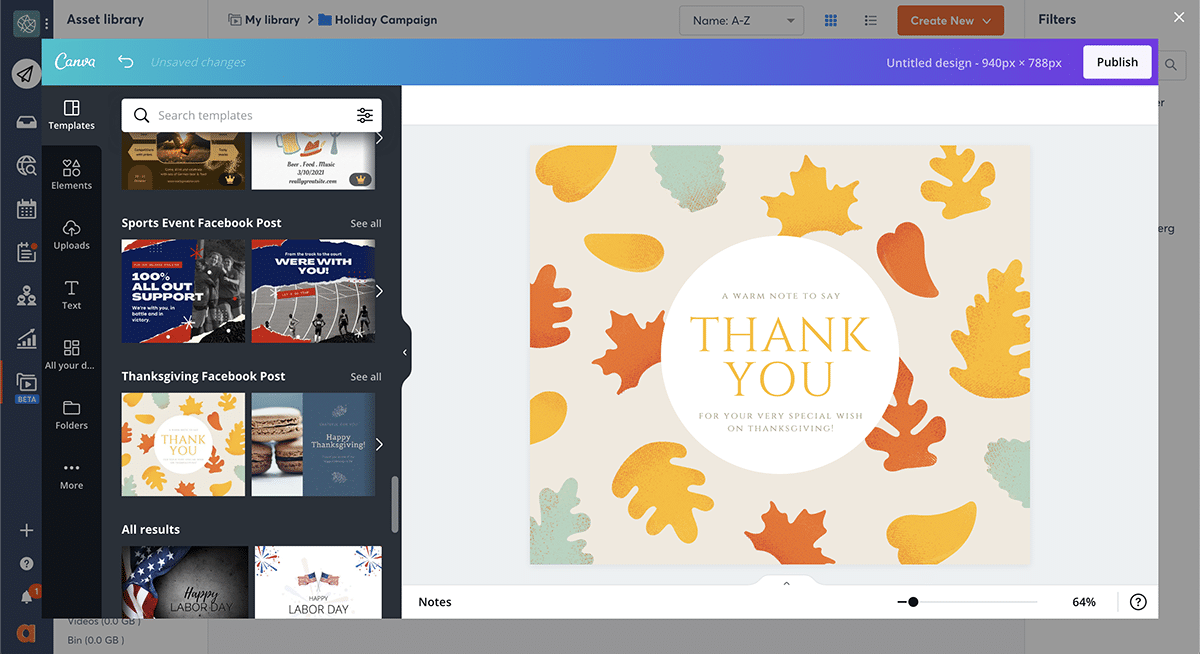
Alternatively, you can streamline your team’s creative process with Agorapulse’s Canva integration. When creating a new item, click Design with Canva and choose the dimensions for your image.
Then proceed to design a post or select an existing design. Click the Publish button to finish adding it to your asset library in Agorapulse.
After uploading assets to your library, you can edit them at any time. Click on an asset to change its name, add a campaign label, write an internal note, or create alt text. If you no longer want the asset to live in your library, click the red Delete file link.
Do you want to add another level of organization to your library? You can select multiple assets and then add labels or move to another folder in bulk.
Locate and attach assets
After creating assets, you can publish them directly from the library. Select an asset and click the orange Publish button or edit the asset and choose Publish this asset from the dropdown menu.
But if you’ve already created drafts, you’ll want to start there instead. Go back to your publishing calendar, and select a draft to edit.
Click the gray Open Library button and select the asset(s) you want to attach. Tap the orange Add files button and proceed to update your draft.

After editing, you can approve the post, send it for approval, or assign it to someone else. Then you can go back and use your asset library to finalize the rest of your campaign drafts.
Create Cross-Channel Campaigns
If you’re creating a relatively simple, single-channel social media campaign, your work may be done. In that case, you can move on to the reporting step of the process.
But if your campaign includes multiple social media channels, you’ll need to create and customize posts for various platforms. Once you’ve created the initial posts, you can set up cross-channel campaigns in just a few minutes.
Duplicate social media posts
First, navigate to your publishing calendar. Find the post you want to publish across channels.
Click the gray Duplicate Post button and select the profiles where you want to publish the content. If you want to proceed with publishing the posts as-is, click the orange Next button.
You can schedule a time and add labels for each channel. Then schedule the posts or assign them to a team member for approval.
Customize content per channel
To avoid cross-posting content customize it for each channel before scheduling or assigning the post. Click on the icon for the channel you want to customize.
Then click the Edit button and change the caption as necessary. For example, you may want to add hashtags to Twitter posts or emojis to Instagram posts. You may also want to alter the tone and messaging slightly or tag other pages on each channel.
In some cases, you may want to take advantage of Agorapulse’s channel-specific options. For example, you’ll want to toggle Send to mobile if you’re planning to create Instagram Stories or do some last-minute filtering before publishing on Instagram. You may also want to modify social media image sizes to optimize for each platform.
After finishing your edits, click the Preview button to review the post. You can cycle through each channel you’ve selected to preview the post on each one. When you’re finished, click the orange Next button to complete the scheduling process.
Prepare and Schedule Social Media Reports
Publishing labels can do more than help your team stay organized. If you label content, you can easily create campaign reports that show a bunch of useful data.
Review social media profile reports
By default, Agorapulse includes publishing labels in every profile report.
To see yours, go to the reports tab and scroll to the bottom of the audience report. Hover over any section of the graph to see the number of published posts from any given campaign during the reporting timeframe.

For more insights, review the global content report for any profile. At the bottom of the page, you can see which campaigns generated the most engagement. You can use this data for future content planning, especially if you want to create more engaging campaigns.
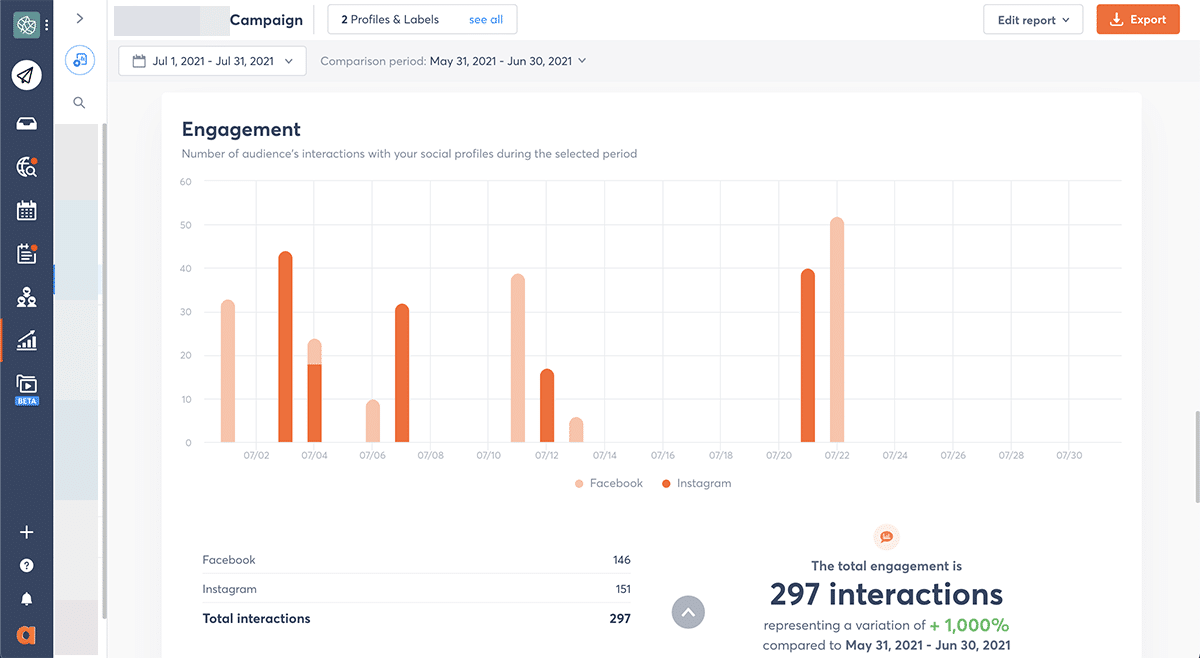
Develop campaign reports
Profile reports offer a good overview of all the content you’ve published. But a campaign report helps you lets you take a more focused look at your results.
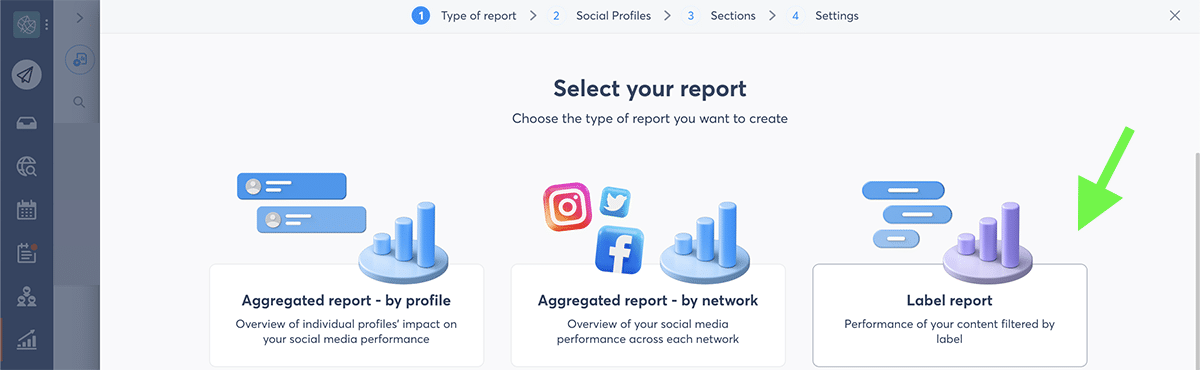
To create Power Reports, click the report icon in the upper left corner. Then select Label Report and choose which profiles and labels to add.
Select the sections to add to your report, including publishing insights, impressions, and engagement. You can also choose the criteria for determining top content on each profile.
Once you create the campaign report, you can view and download it manually at any time. For an ongoing campaign, schedule the report instead. You can add internal team members and external clients to the report to ensure everyone gets a copy.
Alternatively, you can automatically schedule a copy to appear in your inbox every week or month. After reviewing the report, you can type up your analysis and forward a more insightful summary to your colleagues or clients.
In Conclusion
Managing every aspect of a social media campaign may seem daunting at first. But with a full-featured social media solution like Agorapulse, it’s possible to stay organized and run successful campaigns.
Get started on saving time and energy on your own social media management! Check out our free trial of Agorapulse to help you schedule, track, and measure all your social media efforts.
Read more: agorapulse.com


